MFT Mermazing Shaker Card/ MFT Sketch Challenge #495

It’s been a while since I’ve done an MFT Sketch Challenge. Here’s this week’s Sketch:

MFT_WSC_495

For this sketch I decided to pull out MFT’s Mermazing and Gill Friends Stamp sets.

Screenshot_20200627-154947

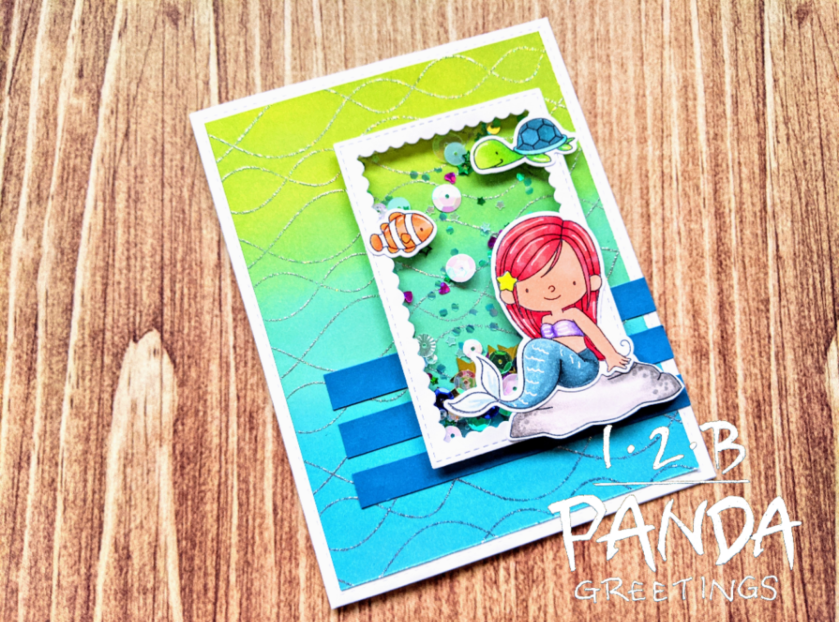
I just wanted to keep things simple and used the image of the sitting mermaid, turtle, clown fish, and rock and I stamped them with Hero Arts Intense Black Ink. I used the following Copic Markers:

Rock: W5, W3, W2
Turtle: YG09, YG06, YG03, BG18, BG15, BG13
Fish: YR68, YR16, YR02, C1, 0
Mermaid: R29, R27,R35, R17, E95, E93, E02, Y06, V17, V15, V12, BG78,BG75, BG72, BG70

I also added white highlights with a Sakura Gelly Roll Pen and added Clear Wink of Stella to the mermaid’s fin and starfish hair accessory.

I ink blended the background panel with Distress Oxide Inks Twisted Citron, Cracked Pistachio, and Mermaid Lagoon. I hit it with my heat gun to make sure it was dry before stamping MFT’s Whimsical Waves Background. I heat embossed the background stamp with WOW Cloud Nine Embossing Powder and trimmed down the panel so it was slightly smaller than an A2 size. It’s hard to tell in the photo but the Cloud Nine Embossing Powder is quite glittery and so much prettier in person. I cut a stitched matte using the largest stitched die from Mama Elephant’s Peek A Frames Die set and adhered the ink blended panel to it.

I cut down 3 strips of dark turquoise card stock and glued them to my card base.

I cut the second smallest frame from MFT’s Stitched Rectangle Scallop Frames and created a shaker window with acetate and 3M foam tape. I adhered my images to the window and filled it with a variety of sequins, chunky glitter, and confetti.

That finishes up my card. I hope you all like it! For details of the challenge or if you wanted to enter it for yourself, you can check it out here.

This card was also entered into Simon Says Stamps Wednesday Challenge here.

Thanks for stopping by!

Lawn Fawn Butterfly Kisses Birthday Box Pop Up Card: Lawnfawnatics Challenge #79

I’m in the final count down of days until my due date.

This week’s Lawnfawnatics Challenge is an interactive challenge, which is awesome because I mostly make interactive cards. I’m still trying to use brand new (to me) stuff that’s been sitting on a pile on my desk for like ever, as well as pull out old things from me stash to use more.

79_interactive

I haven’t used Lawn Fawn’s Scalloped Box Card Pop Up Die in a really long time so I decided to pull it out for this card challenge and create a card using Lawn Fawn’s Butterfly Kisses stamp set.

Screenshot_20200625-151140_2

If you’re unfamiliar with how to use the Scalloped Box Card die, you can check out my Youtube tutorial below:

Screenshot_20200625-151250_2
Front of Card

Screenshot_20200625-151236_2
Back of Card

This card has 4 slats in the box and uses patterned paper from the Craft Smith Mint Pink Paper Pad. I cut the panels instead of using the stitched die included in the die set. I also created mattes for my decorative panels.

Here are the dimensions if you want to do it too:

-Background/ Writing Space Matte: 2 7/8″ x 3 3/4″
-Writing space panel: 2 3/4″ x 3 5/8″
-Panels
-2 11/16″x 1 11/16″ (Bottom right)
-2 11/16″x 1 3/8″ (Top right)
-1 11/16 x 1 11/16″ (need to cut 2 of these: bottom left and back)
-1 11/16″x 1 3/8″ (need to cut 2 of these: top left and back)
-Mattes
-2 7/8″x 1 7/8″ (bottom right)
-2 7/8″x 1 9/16″ (top right)
-1 7/8″x 1 7/8″ (need to cut 2 of these: bottom left and back)
-1 7/8″x 1 9/16″ (need to cut 2 of these: top left and back)

I stamped and fussy cut the images from the Butterfly Kisses stamp set with Lawn Fawn Jet black Ink. I used the following Copic Markers to colour them:

Bear: E33, E31, E41, R22, R20
Rabbit: W5, W3, T1, R20, R22, Y06
Flowers: R20, R22, Y06
Clouds: B000
Butterflies: R20, R22, Y06, Y11, B02, B00, V04, V06, V01 (I also adhered Lawn Fawn Prisma Glitter to the butterflies)

I added stitched cloud details to the background using Lawn Fawn’s Stitched Cloud Backdrop Landscape die and ink blended it with Distress Oxide Inks Squeezed Lemonade, Broken China, and Mermaid Lagoon. I sprayed the panel with water for added interest.

I cut grass panels using Lawn Fawn’s Meadow Border die and adhered them onto the slats. I positioned and adhered all my stamped images in place or onto acetate strips and into the box card using my Zig Two Way Glue Pen and Scotch Tape.

My sentiment, “Fluttering by to say have a magical day”, was from the Butterfly Kisses, as well as the Fairy Friends stamp set. It was glitter embossed with Recollections Marine Tinsel Embossing Powder.

To finish up the card I added a few butterflies to the writing space on the back of the card.

Screenshot_20200625-151216_2

You can check out my card in action here:

Screenshot_20200625-151152_2

If you want to check out this challenge, you can find details here.

This card was also entered into Simon Says Stamps Wednesday Challenge here.

Hopefully this baby comes out soon! I hope you guys like my card. Thanks for stopping by!

Lawn Fawn Smooth Sailing Slider Card: Lawnfawnatics Challenge #78

It’s been a while since I made a card. It’s almost mid June and my maternity leave is quickly approaching. I’ve been busy this past month trying to purge and get my household ready for the baby! Realistically, the baby could come out anytime now. Now that I am mostly done house prep, I can craft until the baby comes out.

During my one year off, I would like to work towards:

1. Getting through the pile of “new” stuff on my desk

2. Creating more by entering more challenges

3. Getting more use out of my older stamp sets by coming up with multiple designs for a stamp set

4. Purging my current stash of things that don’t fit into my current crafting style

5. Becoming more selective on the products I buy and not buying things just because they are on sale

6. Restocking my Etsy Shop

I have these goals in mind but we’ll see how it goes!

78-lawn-fawnatics-scene

This week’s Lawn Fawnatics Challenge is to create a scene which is awesome because that’s pretty much all I do! I’m still working through the pile of stuff on my desk that I haven’t used yet so today I will be using Lawn Fawn’s Smooth Sailing stamp set. This is what I came up with.

 Screenshot_20200612-130029_2

Screenshot_20200612-130043_2

Screenshot_20200612-125907_2

I actually made a mistake on this card but didn’t realize it until I went to glue it to the card base. Due to a cutting error, this card is slightly larger than A2 sized- 4 1/4″x 5 5/8″.

All the images were from the Smooth Sailing stamp set and stamped with Lawn Fawn Jet Black Ink. The images were fussy cut and coloured with Copic Markers. I used the following colours:

Clouds: B00

Rabbit: W3, W0, Y06

Bear: E43, E42

Boats: E37, E33, E31, R29, R27, R35, N1, 0

The background was cut using Lawn Fawn’s Stitched Windy Background and ink blended with Distress Oxide Inks Carved Pumpkin, Dried Marigold, Squeezed Lemonade, Tumbled Glass, Salty Ocean, and Faded Jeans. I wanted a slight border so I trimmed the panel down slightly and adhered the background to a piece of white cardstock that was accidently 4 1/4″x 5 5/8″.

The waves were cut using Lawn Fawn’s Stitched Simple Wavy Borders and ink blended with Distress Oxide Inks Tumbled Glass and Salty Ocean. The panels were sprayed with water to create a splotchy effect and then flicked with the same ink diluted with water on a paintbrush to created speckles. I die cut the slider channel using Lawn Fawn’s Slide On Over Waves. I adhered the larger waves to the card front and prepped my smaller wave panel for the slider element. I used my dwindling supply of pennies (Canada stopped circulating pennies in 2012) and cut a doubled up small piece of 3M foam tape to adhere my penny to my larger sail boat in the sliding channel. The whole small wave panel was popped up with a double layer of 3M foam tape and adhered onto the card front.

I used the skinniest banner from Lawn Fawn’s Everyday Sentiment Banner set and heat embossed the sentiment, “Wishing You Smooth Sailing”, in WOW Opaque Bright White Embossing Powder. I popped the banner up on 1 layer of 3M foam tape and adhered it to my card front. I glued my other images down to my card front to finish up my scene with my Zig 2 Way Glue Pen.

You can check it out in action here:

You can check out the Lawnfawnatics Challenge here. This card was also entered into Simon Says Stamps Monday Challenge here.

I hope you all like the scene that I created! Thanks for stopping by!