Mama Elephant Little Agenda Christmas Card

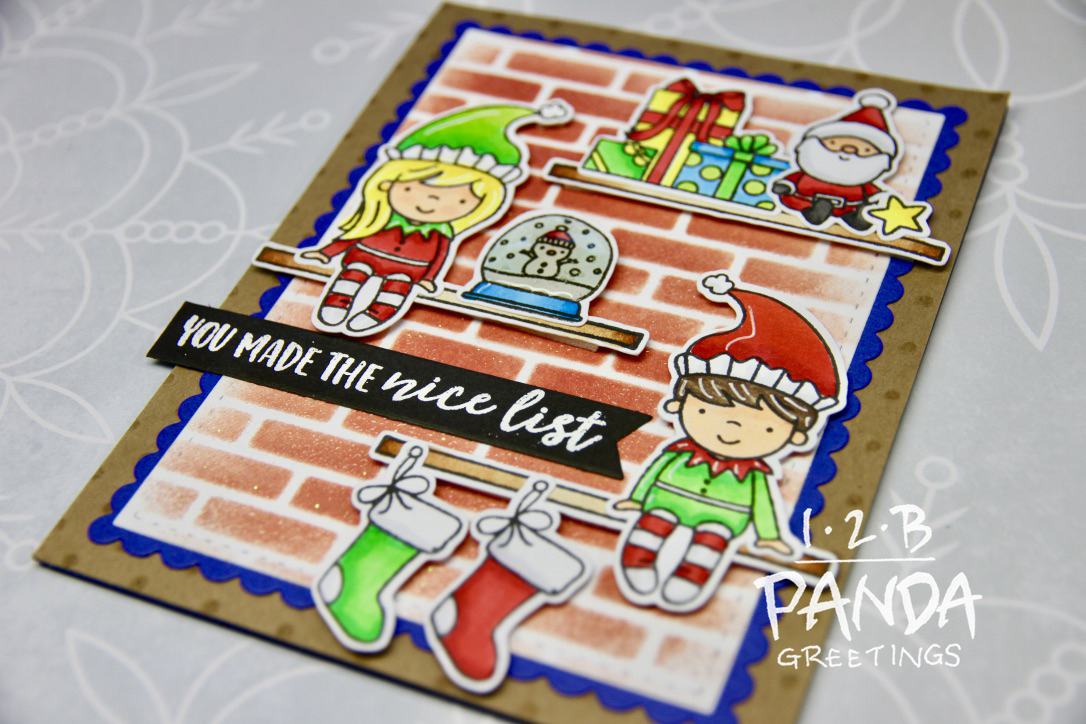
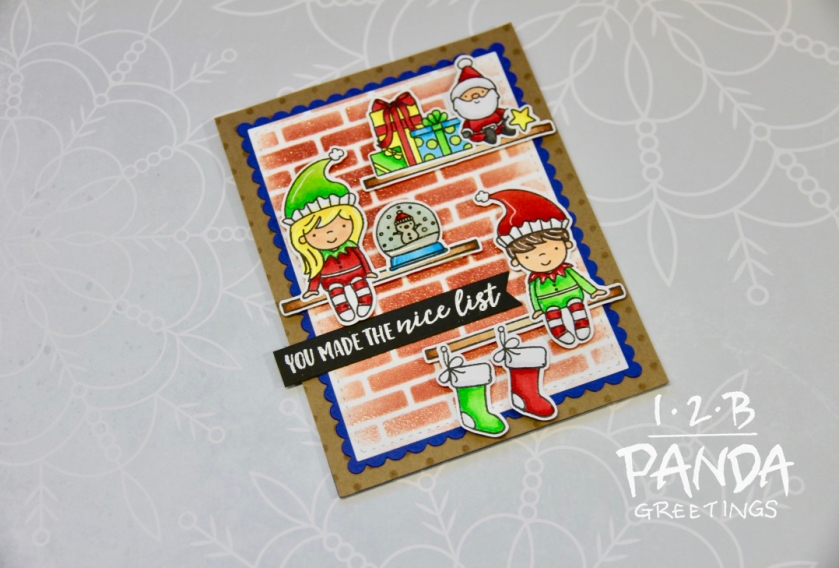
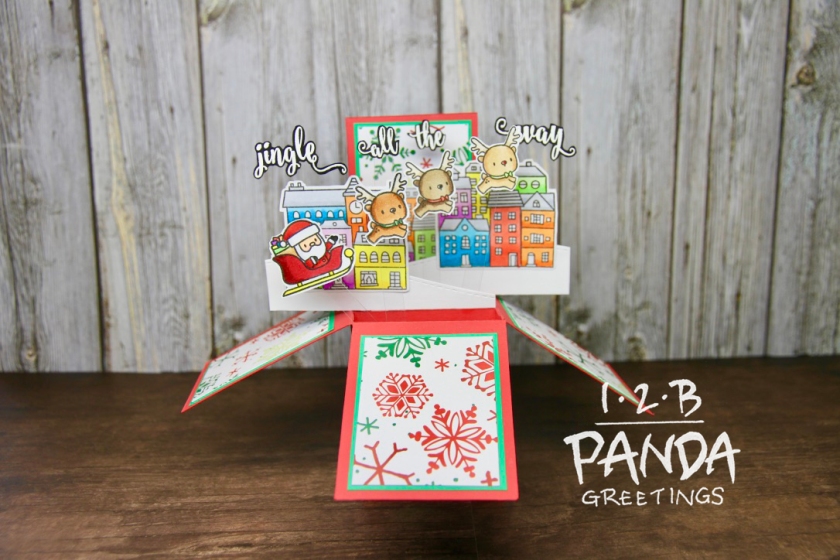
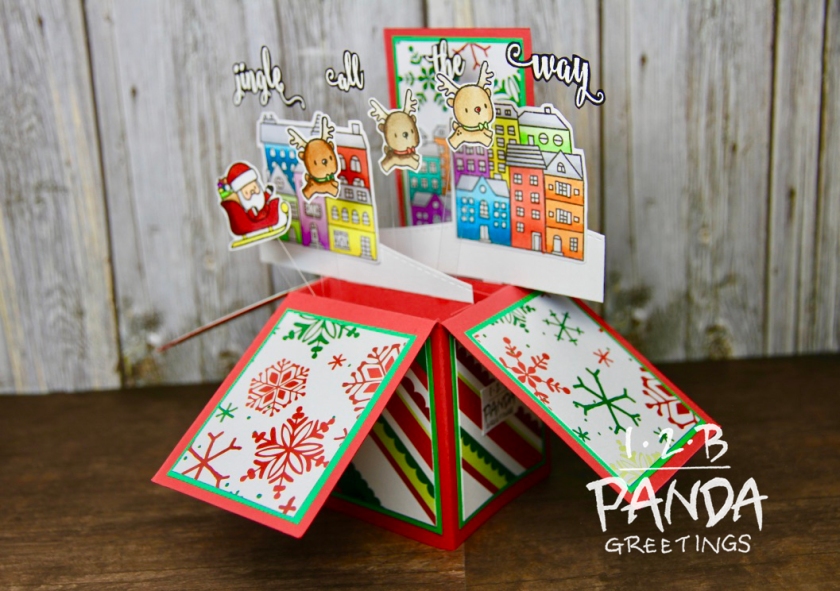
I wanted to create another entry for Mama Elephant’s Top Card Contest. I decided that I wanted to use something from Mama Elephant’s Little Agenda line of stamps. I had ordered the Little Panda Agenda stamps and I was hoping this stamp set would have come in time but I think it’s stuck at the border in customs :(. Hopefully, it’ll come in soon!! I had a hard time deciding what to use and eventually settled on making a Christmas card so I could use 3 of the Little Agenda sets! Is it too early to start making Christmas cards?

Screenshot_20190710-120617_2

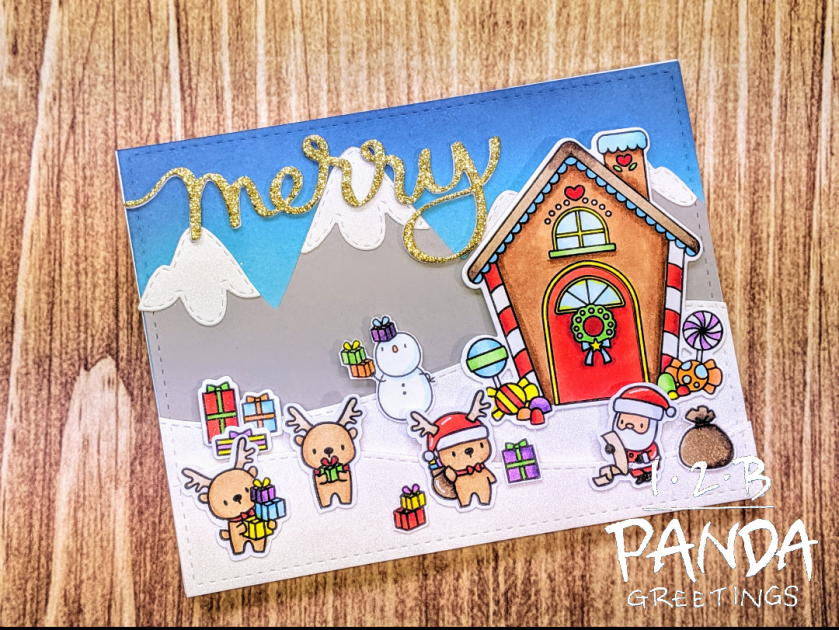
I used Hero Arts Intense Black ink and stamped images from Mama Elephant’s Little Reindeer, Snowman, and Santa Agenda stamp sets, as well as, the house from A Christmas Cookie and the presents from Christmas Spirit! I used the following Copic Markers: E37, E33, E31, E49, E47, E43, E41, W7, W9, C1, 0, B000, B00, B02, R29, R35, R17, E95, YR00, YR02, YR04, Y06, Y08, YG06, YG11, V17, and V15. The house and presents were die cut using their coordinating dies while the other images I fussy cut.

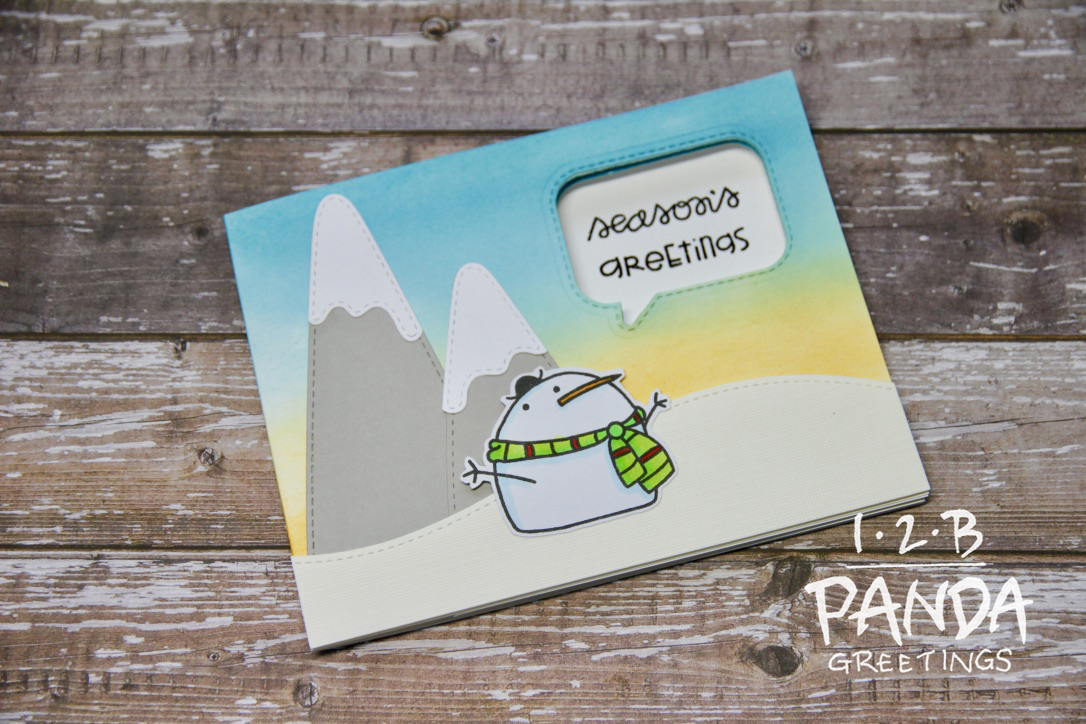
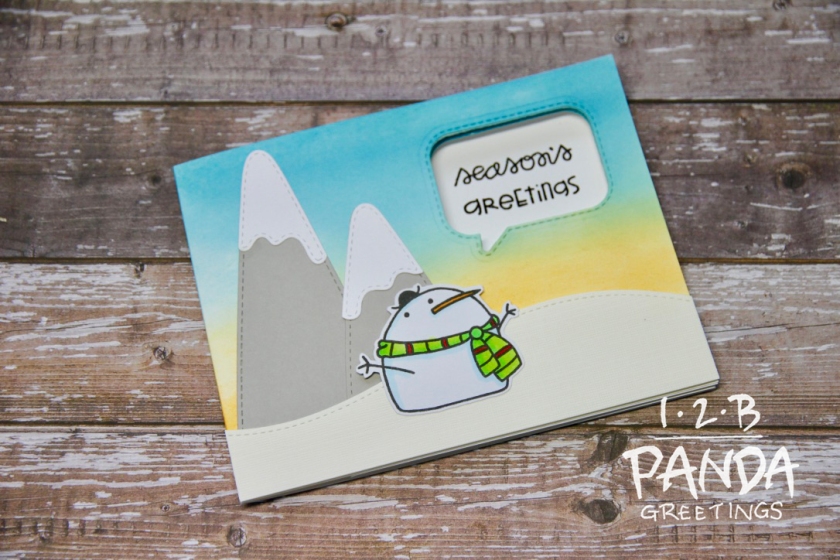
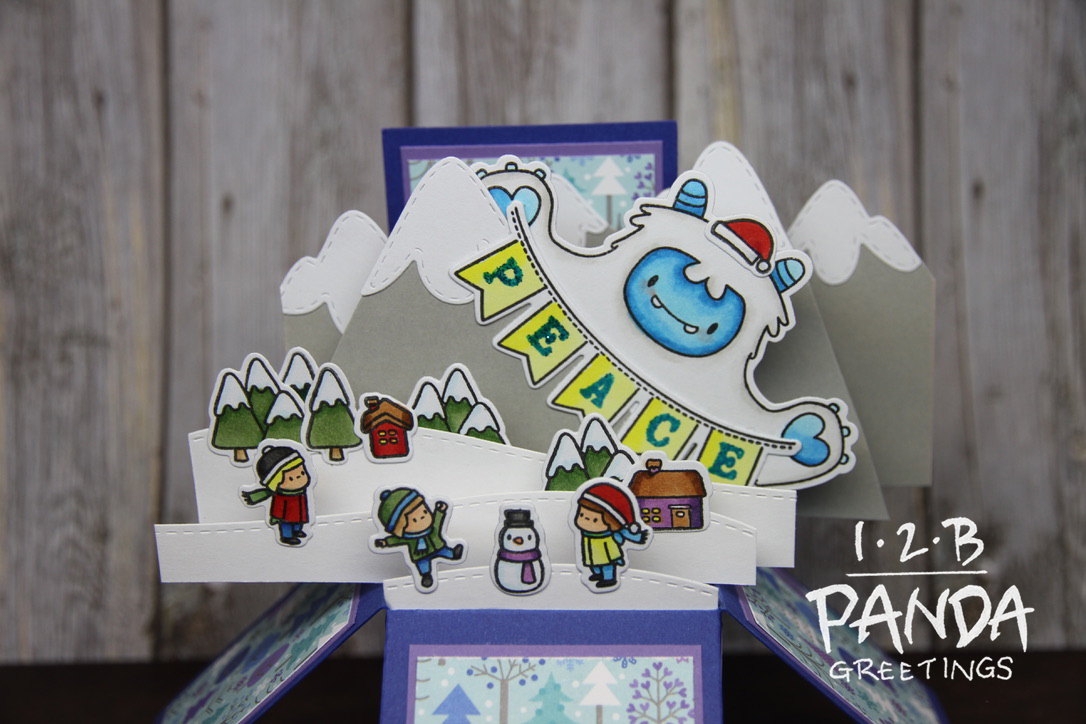
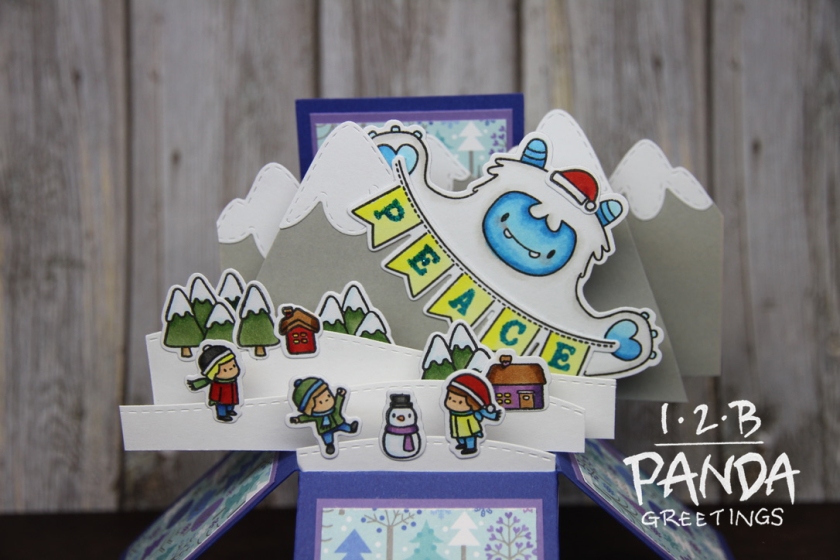
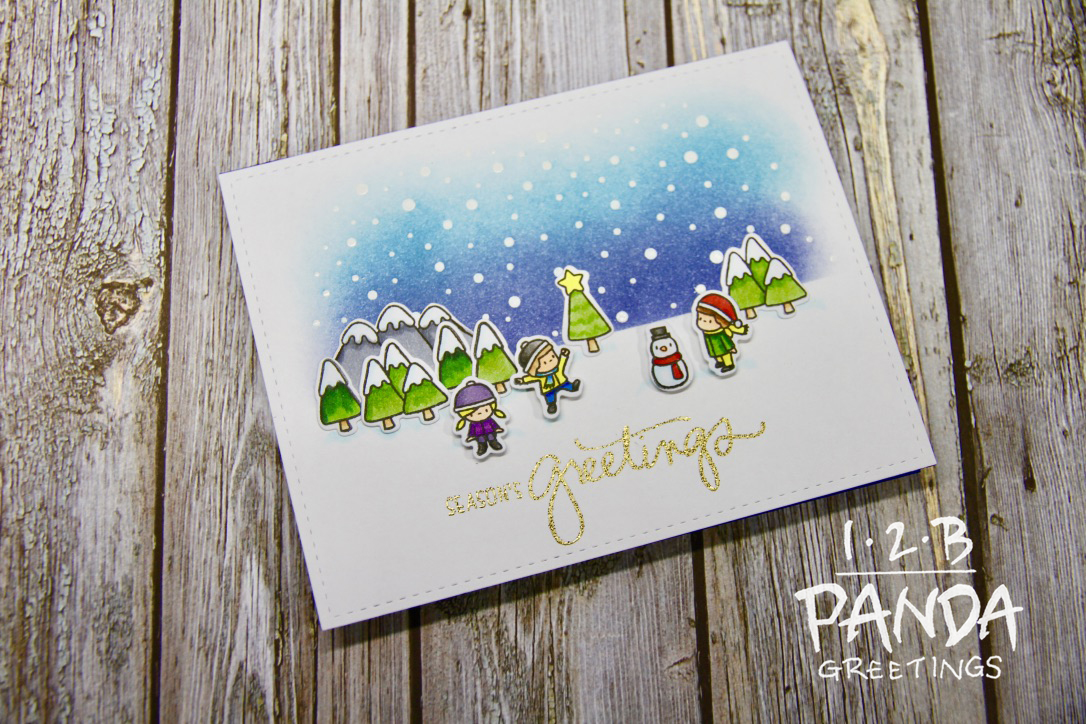
I die cut mountains and hills with Mama Elephant Landscape Trio and Snow Capped Mountains Creative Cuts. To create the illusion of snow, I used white glitter paper from Recollections Holiday Glitz Glitter Paper Pad to cut the hills and the snow caps on the mountains.

Using the large stitched rectangle die from Mama Elephant’s Peek A Frames Creative Cuts, I die cut my card front and then used the die to die cut the stitched lines on the sides of the mountain and hills so the stitched line was continuous.

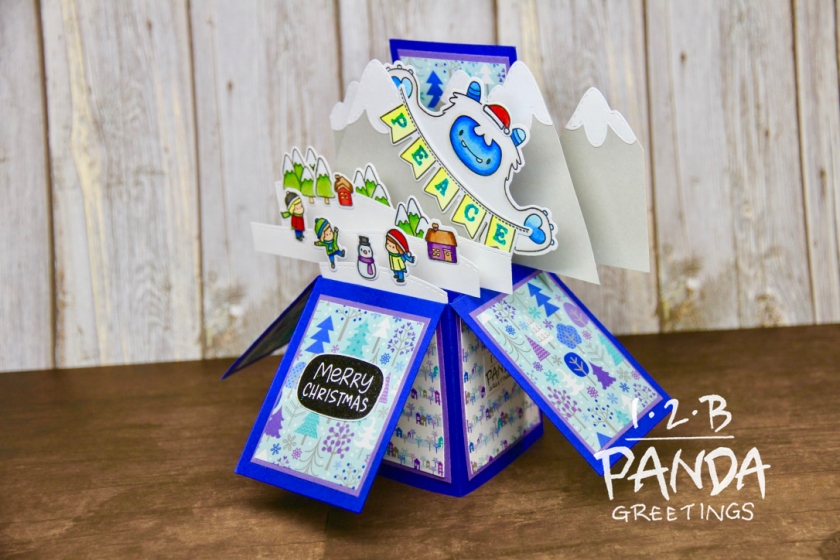
I took my card front and ink blended my background using Distress Oxide inks Tumbled Glass, Broken China, and Faded Jeans.

I adhered my mountains to my card front and then proceeded to adhere my hills and images popped up on 3M foam tape. Since I used glitter paper for my hills, I did have to use some liquid adhesive to adhere some of my stamped images to it. If you’re wondering what liquid adhesive I used, it was Lawn Fawn’s Glue Tube.

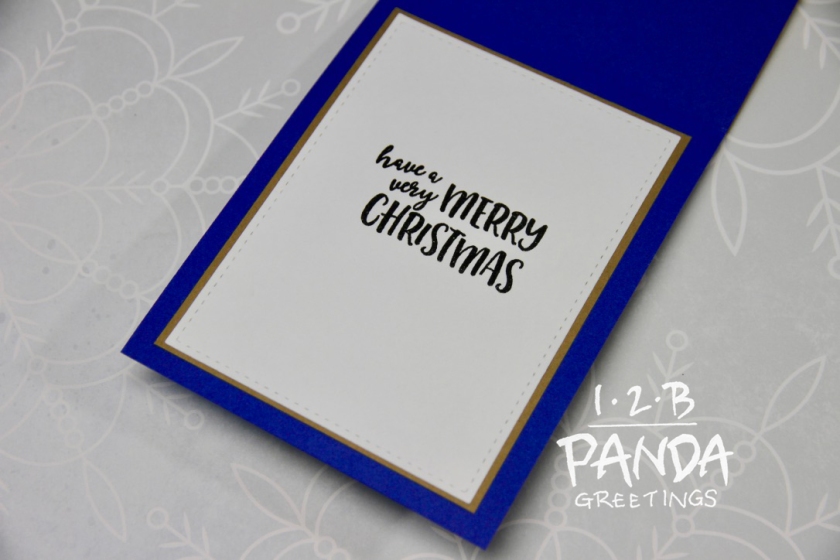
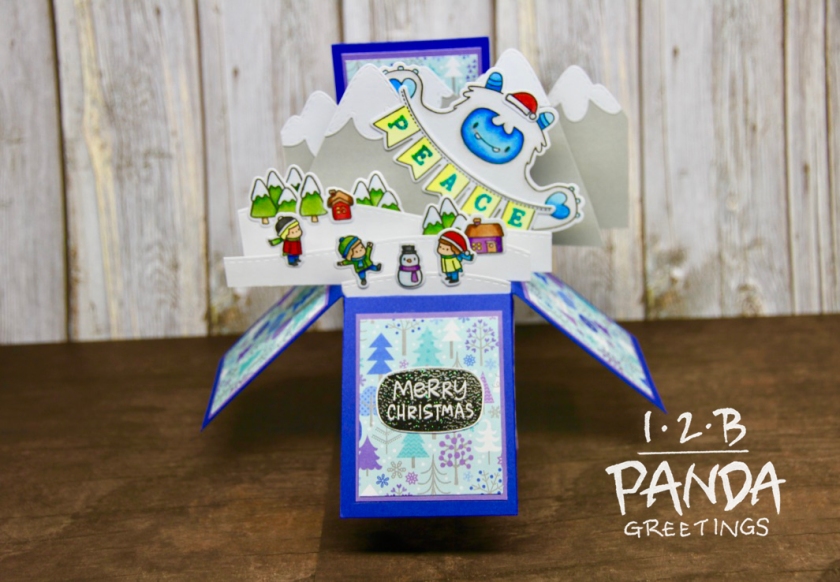
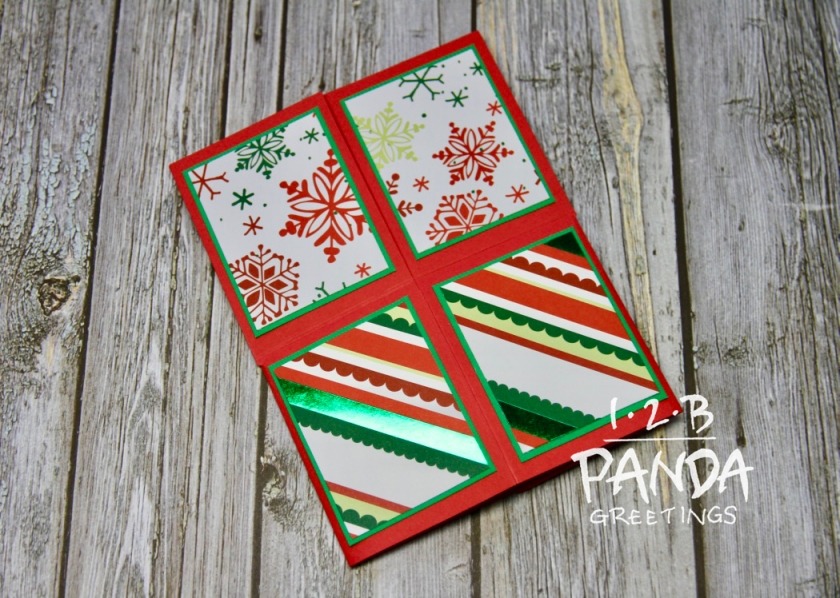
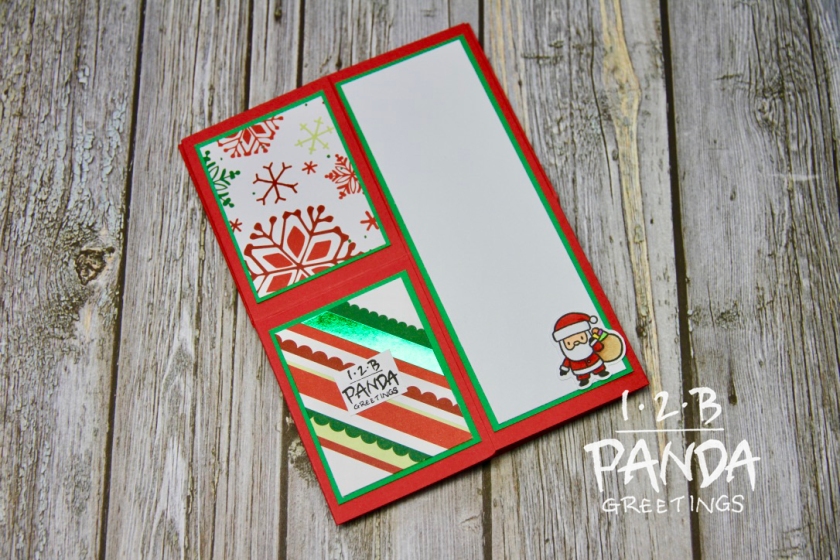
I die cut Mama Elephant’s Merry Script three times (1x Recollections Gold Glitter card stock, 2x 110lb white card stock) and adhered them stacked together then onto my card front.

To finish up my card, I used my Clear Wink of Stella and added shimmer to the presents and the candy on the house.

Hope you all like my first Christmas card for 2019!

This card was also entered into the 30 Day Colouring Challenge here.

Thanks for stopping by!

Neat and Tangled Elfs and Their Shelf Christmas Card

Hey Everyone!

This is my last Christmas card for 2018! I had this stamp in my to-use pile and I’m finally getting around to using it! Neat and Tangled creates some really cute stuff and I simply adore these elves.

%BxylfJXSH+nkSHG4i6A9A_thumb_21f8

I’m also really getting into using stencils lately too. It started when I made
this card and used Simon Says Stamps Waves Stencil for my decorative panels. So for this card, I decided to pull out MFT’s Small Brick Wall Stencil.

Using the brick stencil, I ink blended a white card front panel with Distress Oxide Ink Fired Brick. I promptly heat embossed with Hero Arts Sparkle Embossing Powder to give the card front some shine, subtle sparkle, and texture. I die cut the panel using the stitched rectangle from Mama Elephant’s Basic Set. I also die cut a scalloped panel with Wplus9’s Sunshine Layers out of blue card stock. I cut a piece of kraft card stock down to 4.25″x 5.5″ and stamped MFT’s Swiss Dot Background Stamp with Versamark to create a subtle pattern. I adhered the panels together and set it aside.

I stamped images from Neat and Tangled’s Elfs and Their Shelf Stamp set in Simon Says Stamp Intense Black Ink and proceeded to colour the images with Copic Markers. I used the following colours:
YG09, YG06, YG03, Y08, Y06, R29, R35, R14, B05, B02, B000, C1, T7, T5, E37, E33, E31, E95, AND YR00. I also added some highlights with a white gel pen. I fussy cut all the images and adhered them together with my Zig Two Way Glue Pen. I popped them up on 3M foam tape and adhered them to the card front. As an after thought, I used my Spectrum Noir Clear Overlay Brush Pen and went over the snowglobe and filled it in with some Glossy Accents to give it a bit of dimension.

9kymJdRlQUucQ0pkMQQnaQ_thumb_21fb

Lastly, I die cut a banner out of black card stock using Lawn Fawn’s Everyday Sentiment Banners. I heat embossed the sentiment, “You made the nice list”, from the same stamp set in Lawn Fawn White Embossing Powder. I adhered the sentiment to my card front with scor tape.

For the inside of the card, I die cut another stitched rectangle out of white card stock and trimmed down a piece of kraft card stock to use as a matte. I stamped the sentiment, “Have a very Merry Christmas”, from Neat and Tangled’s Beary Merry Stamp Set in Versafine ink and heat embossed it with Hero Arts Sparkle Embossing Powder.

MRWPaZVFTGe2kO6ka4aSyQ_thumb_21fa

That finishes up my card, I hope you all liked my last Christmas card of 2018.

Happy Holidays!!!

-Diana

Lawn Fawn Critter Concert Christmas Box Pop Up Card

I had time to make another entry for Lawn Fawnatics current challenge. You can check out the challenge here if you’re interested.

I haven’t made a Christmas box card with any Lawn Fawn stamps yet and I had the idea for this card for a while and it’s finally coming into fruition. This is what I came up with:

j9yyjra%QHuKsxUL1KIQ1g_thumb_21f0

If you’re unfamiliar with box cards, you can check out my box card base tutorial here:

6lH11rA5QrWPKEsOqLqkkQ_thumb_21ec
Front of Card

c7vJ+je+Qm2CA7MPjA2eJw_thumb_21ed
Back of Card

I used 3 slats in my box to start and used patterned paper from Lawn Fawn’s Perfectly Plaid Winter 6″x6″ Paper Pad.

I used the following Lawn Fawn products on this card:
1. Critter Concert Stamps and Dies (bird, conductor stick, music stand, music sheets, bow tie, bear, raccoon, music notes, cymbals, and tambourine)
2. Jump For Joy Stamps (owl, fox)
3. Happy Howlidays stamps and dies (large Santa hat)
4. Cheery Christmas (small Santa hat)
5. Nutty Or Nice (holly)
6. Stitched Tree Borders
7. Stitched Hillside Borders
8. Merry Messages (sentiment)

I stamped my images with Lawn Fawn Jet Black ink and did some simple Copic coloring. I used the following Copic colours: R29, R27, Y08, Y06, YR04, C1, E08, E07, E43, E41, E37, E33, E31, B02, B00, W7, W5, W3, R20.

PjQV7al2SISp0Pu29V+xMg_thumb_21f1

I adhered my snow hills onto my slats with tabs cut from scrap card stock and adhered the critters in place. I adhered 2 sets of music notes onto acetate strips and adhered them into my card to the front and first slat. I also adhered one to the background.

For the sentiment, I stamped, “have yourself a merry little Christmas”, with Versafine Ink and heat embossed it with Hero Arts Sparkle Embossing Powder.

I stamped holly from the Nutty or Nice Stamp Set with Lawn Fawn Jalapeno and Chilli Pepper Ink and adhered it above the sentiment.

I had an extra owl playing a violin that I couldn’t fit into my box card so I stuck it onto the writing space at the back of my card.

You can check it out in action here:

5J%4RWmHTbiAuoZKY2w6xQ_thumb_21f3

This is also the last day of the 30 Day Coloring challenge. You can check out details
here.

This card was also entered in Simon Says Stamps Wednesday Challenge here.

Thanks for stopping by!!!

Paper Smooches Swanky Snowdudes Christmas Peek A Boo Card

I’m really liking peek a boo cards these days. The Swanky Snowdudes Stamp Set was in my “to use” pile and I thought using this stamp set would be a great peek a boo card with a speech bubble.

26dCWKAxR4W70ZUiyEXggA_thumb_21e1

rd9klkOTSOS2lFEBUTfZ5Q_thumb_21e3

I cut 3 pieces of card stock for this card.
1. 4 1/4″ x 8 1/4″ (Score at 2 3/4″)- FRONT
2. 4 1/4″ x 8 1/2″ (Score at 4 1/4″)- INSIDE
3. 4 1/4″ x 5 3/4″ (Score at 5 1/2″)- BACK

I die cut the speech bubble using MFT’s Birthday Speech Bubbles out of my front and inside pieces and making sure the windows line up.

I assembled the card base using Score tape. I started with the back piece and put Score tape on the small flap and adhered it to my inside piece as if to make a “z” shape out of the two pieces. I lined up my windows on the front and inside pieces and adhered them together. The small flap on the front panel gets tucked between the inside and back piece and creates the surprise when you open the card.

I ink blended my front and inside pieces with Distress Oxide Inks Carved Pumpkin, Tumbled Glass, and Broken China. I used my Clarity Stamp Stencil Brushes to brush the ink on so it would be a lighter application. This is actually my second time using these brushes and I find that they shed a lot of bristles while I’m trying to apply my ink. Does anybody else have this problem? It’s kind of annoying.

I stamped my snowmen and bird out with Simon Says Stamp Intense Black Ink and coloured them with Copic Markers. I used the following colours: B000, E43, E47, E49, YG03, YG06, YG09, YR04, C1, T7, T5, Y08, Y06, R29, and R27.

I fussy cut out my snowmen and then proceeded to die cut some mountains with MFT’s Snow Capped Mountains Dies and hills using Lawn Fawn’s Stitched Hillside Borders.

On the front of the card, I adhered my mountains in place with my Zig Two Way Glue Pen and popped up my hillside and snowman with 1 layer of 3M Foam Tape. I stamped the sentiment, “Season’s Greetings”, with Versafine Ink and heat embossed it with Hero Arts Sparkle Embossing Powder.

On the inside, I glued my hillsides and characters down then proceeded to heat emboss, “Let’s Chill”, with Recollections Marine Tinsel Embossing Powder.

Check out this card in action:

That finishes up my card. I really love the end result of these peek a boo cards. They’re so much fun!!

This is Day 26 of the 30 Day Coloring challenge. You can check out details
here.

This card was also entered into Simon Says Stamps Wednesday Challenge here.

Mama Elephant Me and My Yeti Christmas Box Pop Up Card

I think this is my favourite Christmas card that I’ve made this year!

bBQPFobWS%qDCSqUyGQkqg_thumb_21dc

Mama Elephant’s Me and My Yeti Stamp set includes several great scene building elements like tress, houses and snowmen. I’ve really enjoyed using this stamp set this holiday season.

If you’re unfamiliar with box pop up cards, you can check out my box card base tutorial here:

This card has 5 slats and features patterned paper from the Doodlebug Polar Pals 6×6 Paper Pad.

stale_thumb_21cb
Front Of Card

WayzmZ+8SdaachQ9ZeW+jw_thumb_21cc
Back of Card

I stamped and die cut out the images with Simon Says Stamp Intense Black Ink and I used the following Copic markers:

Yeti: B05, B02, B00, R20, W2, W0, 0
Banner: Y06, Y11 (PEACE was heat embossed with Recollections Marine Tinsel Embossing Powder)
Trees: YG67, YG63, E31, E33, B000
Houses: R29, R27, E37, E33, Y06, V17, V15
Snowman: V17, V15, B000, YR02, T7, T5
Kids: E95, YR00, Y06, Y11, R29, R27, YG67, YG63, B18, B14, B12, B05, B02, C1, T7, T5, E33, E31, E37

stale_thumb_21dd

I used Mama Elephant’s Landscape Trio to cut stitched hills for the front and first 2 slats and Mama Elephant’s Snowcapped Mountains Die for the last three slats and the background. The mountains and hills were adhered onto my card slats with scrap card stock tabs.

For my sentiment, I used, “Merry Christmas”, from Mama Elephant’s Puffy Holiday Greetings. I stamped it with Versafine and heat embossed it with Hero Arts Sparkle Embossing Powder.

I finished up the card by adhering an extra boy and snowman to the writing space.

You can check out the card in action here:

fdjQRgmSQ5uscGEvFZFb5Q_thumb_21de

This is also day 25 of the Daily Marker 30 Day Colouring Challenge. You can check out details here.

This card was also entered into Simon Says Stamps Wednesday Challenge here.

Mama Elephant Merry Mail Christmas Box Pop Up Card

Every September is “Stamptember” over at Simon Says Stamp, where they release collaborative stamp sets with various companies. It’s one of the most exciting times of year for card makers. I do enjoy seeing the limited edition exclusive collaborative stamp sets and this year I managed to acquire 2 of them- the one for Mama Elephant and Lawn Fawn.

You can check out the card I made using the Lawn Fawn/ Simon Says Stamp Collaborative stamp set here.

Mama Elephant’s collaborative stamp set this year features several sky elements, Santa in an airplane, a parachuting elf, presents, and mail. It is a very cute stamp set and a great addition to the Mama Elephant line.

Sky scenes are great for box pop up cards. This is what I came up with:

nFvYemKUQ%KVedgVXl1wyw_thumb_21d2

The photos don’t do this card justice. All the clouds and the “Merry” script are all quite shimmery. The camera doesn’t do very well picking that shimmer up.

If you’re unfamiliar with box cards, you can check out my tutorial for how to make the base here:

There are 3 slats in this box to start and I used pattered paper from Recollections Traditional Holiday Christmas Paper Pad and PCWV The Evergreen Stack Paper Pad.

UPludrsrSNe0AAGYYQBPAg_thumb_21c8
Front of Card

stale_thumb_21ca
Back of Card

I stamped and coloured the images using Simon Says Stamp Intense Black Ink. I used the following Copic colours:

Santa/ Airplane: R29, R27, C1, YR00, B05, B02, B00, Y08, Y06, T7
Elf: G29, G24, R29, Y08, Y06, C1, B05, B02, B00, B000, R59, R56, YG06, T5, T7
Presents/mail: same colours as above + V17, V15

stale_thumb_21d3

I die cut 2 cloud borders using Mama Elephant’s Landscape Trio. I applied little scrap card stock tabs to them and adhered them into my box card on the front and on the 3rd slat. I started building my scene and adhering all my other elements into my card on strips of acetate.

I took Mama Elephant’s City Sidewalks and used the sentiment, “Greetings of the season”, and heat embossed it with WOW Opaque Bright White Embossing Powder on black card stock. I cut it down to a strip and adhered it on my front flap.

I applied my Spectrum Noir Clear Overlay Brush Pen all over the cloud borders, clouds and merry script and I finished up my card by gluing to presents on the writing space.

You can check it out in action here:

stale_thumb_21d4

That finishes up my card, I hope you guys enjoyed it.

This is Day 22 of the 30 Day Coloring challenge. You can check out details
here.

This card was also entered into Simon Says Stamps Wednesday Challenge here.

Mama Elephant Me and My Yeti Simple Ink Blended Christmas Card

I’ve been LOVING Mama Elephant’s Me and My Yeti Stamp set these days. I really do love stamp sets that include elements that I can scene build with and this stamp set is AWESOME for that. The stamp set includes several background elements like mountains, houses and trees, as well as several different kids you can add to the scene. Today I am making just a simple ink blended Christmas card.

YySRUhZoTKmS71u3R4JWHg_thumb_21c7

I die cut a card front panel using the largest stitched rectangle from Mama Elephant’s Peek A Frame Die Set and masked off the bottom section of the panel with a piece of scrap paper (masked off a little less than half). I stamped snow with MFT’s Snowfall Background and heat embossed it with Lawn Fawn White Embossing Powder.

With the mask still in place and using some Distress Inks, I ink blended with Chipped Sapphire and Broken China. I took a piece of paper towel and buffed the embossing to get off some residual ink and to make the embossing look whiter.

I stamped and die cut all my images using Simon Says Stamp Intense Black Ink. I coloured them with the following Copic Colours:

Mountains: C5, C3, B000
Trees: YG67, YG65, G29, G24, E31, E33
Girl: E95, YR00, V17, V15, V28, V25, Y08, Y06
Boys: T7, T5, Y08, Y06, E95, YR00, E33, E31, E37, B18, B14, B12, R29, R27, YG67, YG63

I adhered the trees and the mountain down to my card front with my Zig Two Way Glue Pen. I used 3M foam tape on the girl, boys, and snowman to give them a little bit more dimension.

I added a bit of Copic B000 under the trees and characters to ground them on my scene.

My sentiment, “Season’s Greetings”, is from Mama Elephant’s Jingle Greetings Stamp set and was heat embossed with Recollections Gold Tinsel Embossing Powder.

This is Day 20 of the 30 Day Coloring challenge. You can check out details
here.

This card was also entered into Simon Says Stamps Monday Challenge and Wednesday Challenge.

Mama Elephant So Many Snowmen Ink Blended Christmas Card

Mama Elephant’s Christmas release are my favourite! I bought the So Many Snowmen Stamp set a couple months ago in anticipation for the Christmas card making season. I really do love this series of stamps that Mama Elephant has been doing with crowds of a particular theme. Other than snowmen, there are also cats, dogs and bunnies. In the last couple coordinating dies they released they also include a scripty word die. For this particular set it’s, “Let It Snow”. With the bunny set, it’s “Happy Easter”. I think it’s a great addition and incentive to buy the dies!

9yrZxZpzR8GAlRhk7cFCuw_thumb_21c4

I stamped and die cut out the snowmen using Simon Says Stamps Intense Black Ink and I coloured this large image using the following Copic Markers:
B000, T7, T5, T3, YR02, G07, G05, G02, E37, E33, E31, E47, E43, E41, R22, R20, B05, B02, B00, R29, R27, R17, V28, V22, V25, C3, C1, 0, Y06, Y11, Y28, Y21.

I did add some extra stripes to some of the scarves with a Copic Multi liner. This particular liner is great because it doesn’t bleed with the use of Copic Markers.

I brushed the glasses and the heart with my Clear Wink Of Stela and applied some Glossy Accents. I also added some Red Stickles on the holly berries and set it aside to dry.

I stamped out an extra snowfall background from a previous project so I pulled that out. The snowfall was stamped using MFT’s Snowfall Background and heat embossed it with Lawn Fawn White Embossing Powder. I ink blended it with Distress Oxide Inks Worn Lipstick, Tumbled Glass, and Broken China. I buffed the snow with a dry paper towel to get off any residual ink and to make the embossing look more white. I die cut card front using Mama Elephant’s Peek A Frame Die Set for the large stitched rectangle die.

I die cut, “Let It Snow” three times. Twice out of 110lb white card stock and once out of a gold glitter card stock and adhered them together. I adhered it onto my card front with my Zig Two Way Glue Pen. I adhered the snowmen onto my card front with 3M foam tape.

This card is also Day 19 of the 30 Day Colouring Challenge. You can find details about that here.

This card was also entered in Simon Says Stamps Monday Challenge and Wednesday Challenge.

Lawn Fawn Nutty Or Nice Christmas Shadow Box Card

I wanted to make a shadow box card for a really long time and I’m finally getting around to doing it! For this card I’m using the Simon Says Stamp/ Lawn Fawn collaborative stamp set- Nutty Or Nice. I originally filmed the making of this card, as well as some of my other Christmas cards to make Youtube tutorials but unfortunately, my video device died and I lost all my footage :(. There will be no Holiday card series this year T_____T….

x%+pEw9xQfKJDmGZpPeH9w_thumb_18b8

JjFRVIULR+elUKmtwab6WQ_thumb_18bb

uZpA9F2xSg+9ZduV0j0Jpg_thumb_18ba

I’m not really going to explain how I made my shadow box itself, as I’m super disappointed with my broken phone and lost footage.

Here’s a list the supplies I used for this card below.

I used the following stamps and dies:
-Lawn Fawn Nutty Or Nice Stamp and Die Set
-MFT Whimsical Woodgrain Background Stamp
-Lawn Fawn Small Stitched 4 Bar Rectangle Dies
-MFT Stitched Oval Stax

I used the following Copic Markers:
Snowman: B000, 0, BG09, BG05, BG01, 100, C9, C7, C5, R37, R35, R32
Squirrel: E37, E33, E31, YG09, YG06, YG11
Branch: E59, E57
Ornaments:
-R37, R35, R32, R20, C1, 0
-YG09, YG06, YG11, BG09, BG05, BG01
-B18, B14, B12, B00
-Y08, Y06, Y11
-YG09, YG06, YG11, V06, V04, V01

Ink:
Lawn Fawn Walnut, Chili Pepper, and Jalapeno
Distress Oxide: Worn Lipstick, Broken China, and Mermaid lagoon

Embossing Powder:
Wow Bright White (sentiment)
Simon Says Stamp Antique Gold (Woodgrain background)

I also used Clear Wink of Stella and Glossy Accents on the ornaments and White acrylic craft paint and Pearl Perfect Pearls were sprayed onto the background.

The matte for the stitched Rectangle for the writing space is cut to 3 1/8″x 4 9/16″

+ciinj35SsW5%vSHEWFJlA_thumb_18b9

This isn’t as surprising as some of my other card videos but I do love the surprise of it being a shadow box card and the depth and dimension you can get in a scene.

This card was entered in Lawn Fawnatics Challenge #40 here.

This is day 16 of the Daily Marker 30 Day Colouring Challenge. You can check out details here.

This card was also entered in Simon Says Stamps Wednesday Challenge here

Thanks for stopping by!!

Mama Elephant City Sidewalks Christmas Box Pop Up Card

I’m a little bit slow this year for making Christmas box pop up cards. My attention was really directed at ink blending for the last few days. Ink blending was just so fun but now I’ll turn my attention to getting some box pop up cards done!

Mama Elephant’s City Sidewalks Stamp set, as well as the Little Santa Agenda stamp set, were still sitting in my to-use pile so it’s time to finally use them!

tN0XFWKLRwyIciC527sSlg_thumb_18c2

If you’re new to box pop up cards, you can check out my tutorial below on how I make by box card base:

8hgokJEdQ26gL71V0T2dvQ_thumb_18b6
Front of Card

PB5mmuWISeq8FVsAdcaaYQ_thumb_18b7
Back of Card

I had 3 slats in my box to start and I used patterned paper from DCWV The Evergreen Stack for the decorative panels on my box card.

I used the following stamps and dies on this card:
1. Mama Elephant City Sidewalks Stamp
2. Mama Elephant Little Santa Agenda Stamp
3. Mama Elephant Little Reindeer Agenda Stamp
4. Mama Elephant Christmas Scene Stamp
5. Mama Elephant Landscape Trio Dies

I used the following Copic colours:
-Reindeer: E37, E33, E31, E47, E43, E41, G29, G24, YG06, YG11, R14, R17, R29
-Santa: R29, R27, R59, R37, E33, E31, C1, E95, R20, YR00, Y08, Y06, T7, YG06, BG09, V04, YR02, R14
-Houses: BG09, BG05, BG01, Y06, Y08, R17, R14, YG06, YG11, C1, C3, V04, V01, YR07, YR02

%3gSUf0zSc+R8kBn+1M5Ew_thumb_18c0

I heat embossed the sentiment, “Jingle all the way”, with WOW Opaque Bright White Embossing Powder on black card stock and fussy cut each word out.

I assembled my scene first by adhering 2 hill sides into my box card base using little card stock tabs. Santa, the reindeer, and the sentiment were adhered into my box card on strips of acetate.

I finished up my card by adhering another Santa to the back of the card on the writing space.

You can check it out in action here:

c+rO7tQnQHKq0GLUqHSCsw_thumb_18c1

This is day 15 of the Daily Marker 30 Day Colouring Challenge. You can check out details here.

Thanks for stopping by!!