WPlus9 All Year Cheer Mother’s Day Tunneling Shadow Box Card

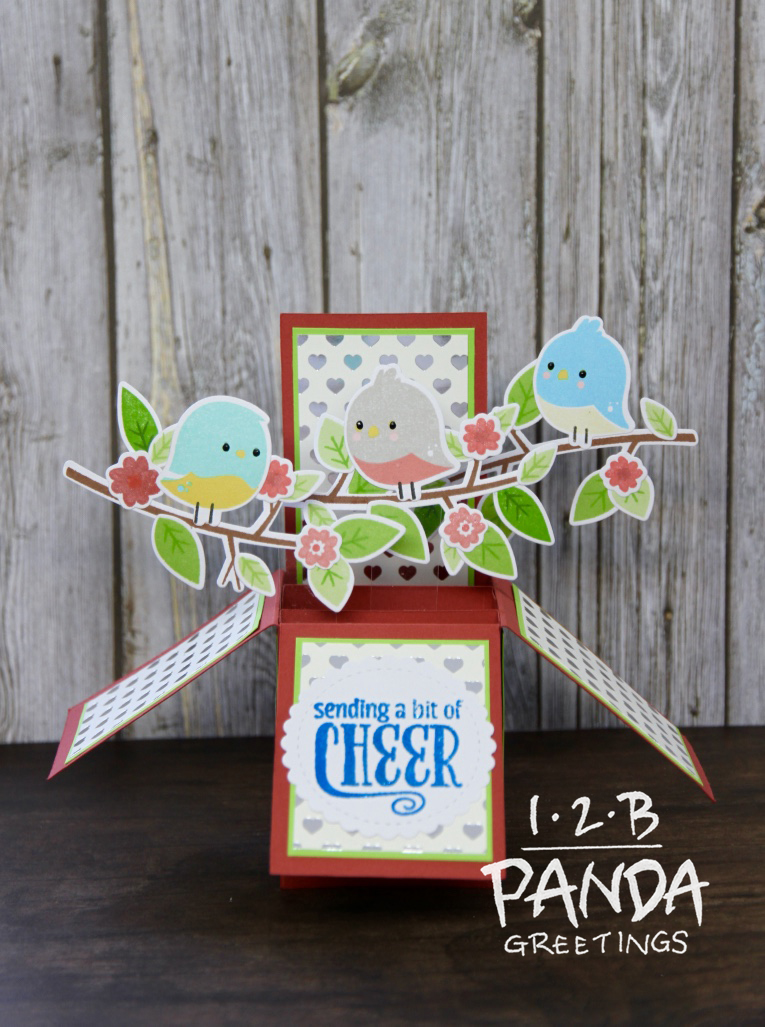
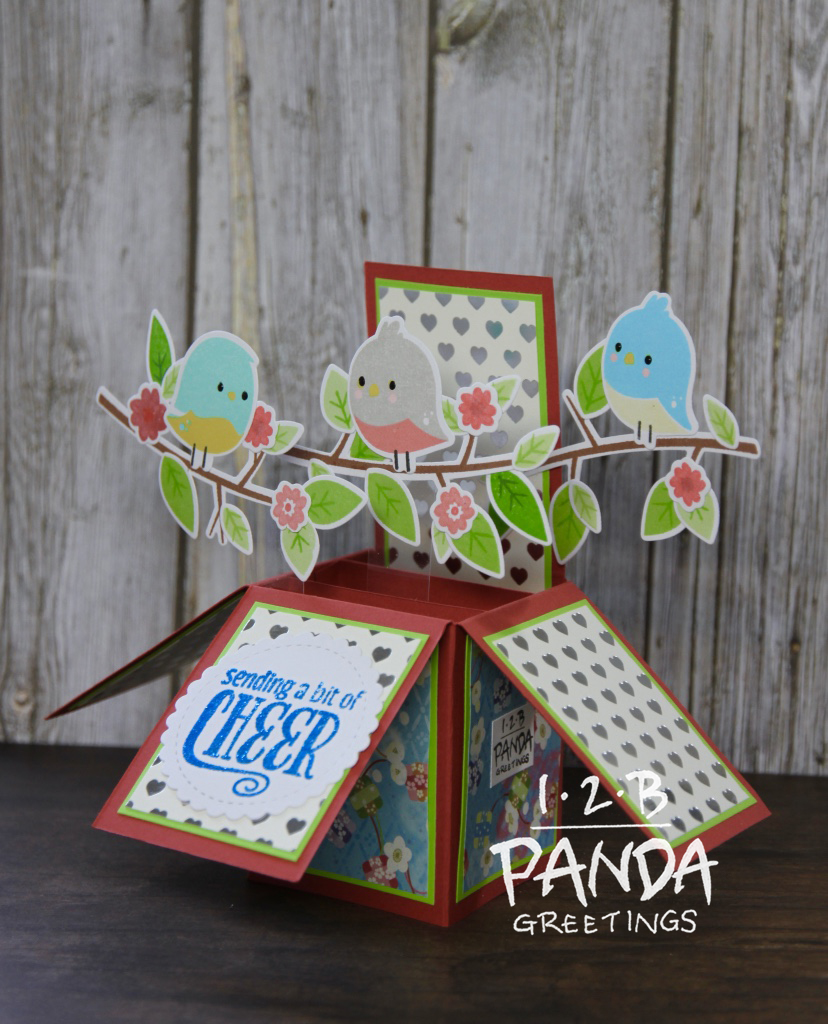
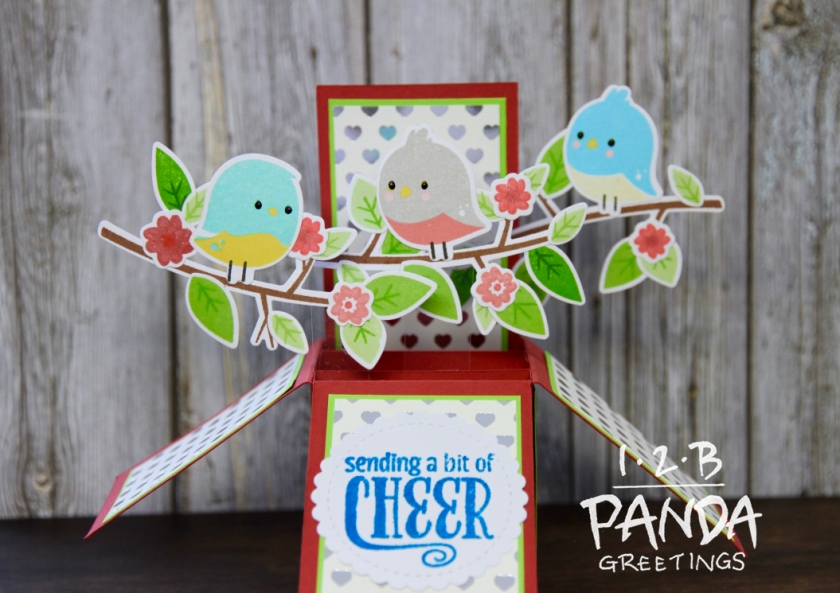
I had the idea for this shadow box card with these cute bird stamps from WPlus9’s All Year Cheer stamp set! I’m not writing up a full tutorial for this card but I will list all the supplies I used.

2k9niqXnScirIvOi8ZkCHQ_thumb_224a

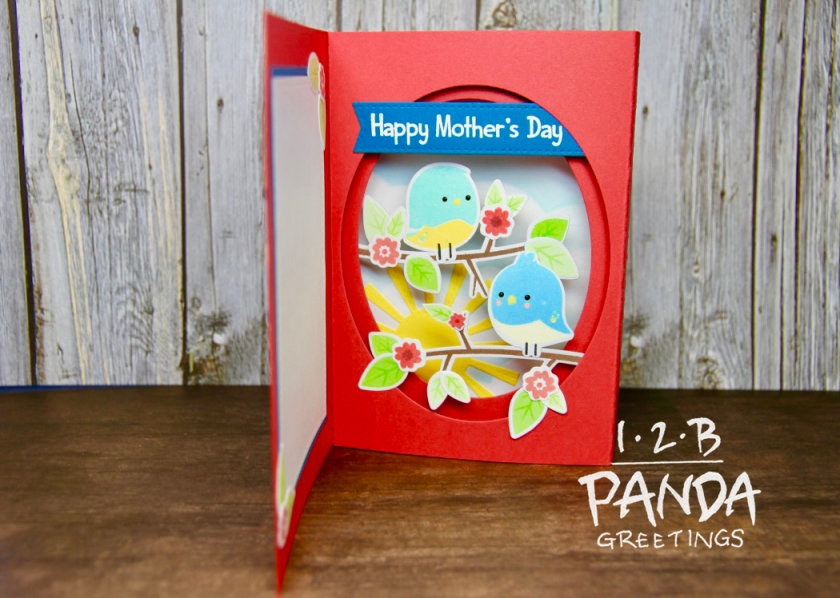
I started this card out by stamping and die cutting my images. I used the following inks for my images: Lawn Fawn Cranberry, Guava, Wildrose, Freshly Cut Grass, Celery Stick, Sunflower, Manatee, Merman, Butter, Walnut, Fresh Lavender, Sugarplum; Hero Arts Neon Blue; and MFT Bubblegum Ink. I used Tonic Ebony Black Crystal Drops in the birds’ eyes to give them a bit more dimension.

kRQ0lWX+RJqbDturpnmvAA_thumb_2249

I used a bunch of products on this card besides Wplus9’s All Year Cheer Stamps and Dies. For the front I used:
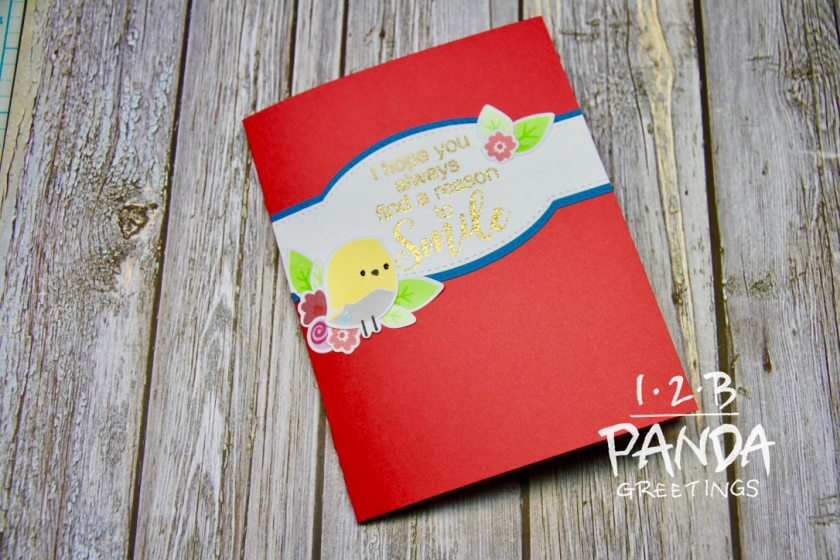
1. MFT Sentiment Label Strip Die
2. Simon Says Stamp Choose Happy for the sentiment, “I hope you always have a reason to smile” (embossed with Recollections Gold Tinsel Embossing Powder)

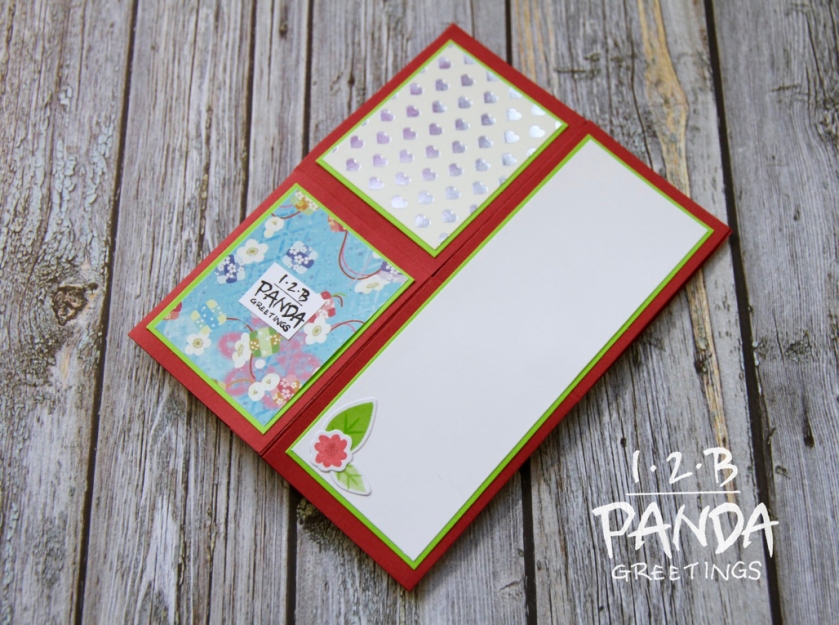
For the inside, I used:
1. MFT Stitched Oval Stax (2 largest ovals) to cut the shadow box window
2. Simon Says Stamp Mother’s Day Zingers for the sentiment, “Happy Mother’s Day” (Embossed with WOW Opaque Bright White Embossing Powder)
3. MFT Blueprints 20 (stitched sentiment banner)
4. MFT Sunny Skies Die
5. MFT Cloud Stencil (ink blended with Distress Oxide Tumbled Glass Ink)
6. Lawn Fawn Small Stitched 4 Bar Rectangle (the largest rectangle for the writing space)

SjQIOO04Qtup9Cen6QZo9A_thumb_224b

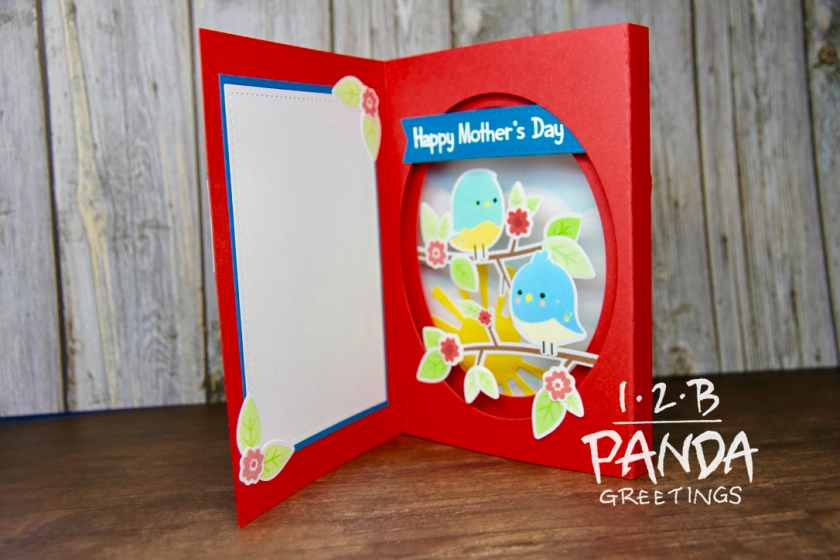
The matte for the stitched rectangle writing space was cut to 3 1/8″ x 4 9/16″.

I also applied Clear Wink of Stella on all the flowers.

You can check it out in action here:

This card was entered into Simon Says Stamps Wednesday Challenge here.

Thanks for stopping by!!

Day 8- 30 Day Color Challenge: WPlus9 All Year Cheer Box Pop Up Card

challenge_graphic-mar16_plain-650-1

I wonder how long I can keep up with making box cards for this challenge? Ideas just keep coming to me, so I guess as long as I have the time to make them, I can keep pumping them out!! 😀

Today I’m featuring WPlus9’s All Year Cheer Stamps. I absolutely love these birds! I think they are absolutely adorable and I like the fact that they are layering stamps so you can stamp each section in different colours. This is what I came up with:

thumb_IMG_7237_1024

If you’re unfamiliar with how to make the box pop up card base, check out my post here or check out my Youtube video below.

I pretty much make them the same way every time except change out the card stock that I use for the decorative panels. The silver hearts card stock is from Recollections Silver Foil Paper Pad and the floral blue paper is actually origami paper that I bought from this quaint Japanese store in Edmonton called Ki-Fu-Ne Japan.
 

thumb_IMG_7229_1024
Front of card

thumb_IMG_7231_1024
Back of card

So I started out this card by stamping out all the images. I used a bunch of ink so I’ll list them.

-Birds: Lawn Fawn ink in Wildrose, Manatee, Sunflower, Merman, Butter, Hero Arts Neon Blue, MFT Bubblegum ink, and Simon Says Stamp Intense Black Ink.

-Branches: Lawn Fawn Walnut Ink

-Leaves: Lawn Fawn ink in Jalapeno, Noble Fir, Celery Stick, and Freshly Cut Grass.

-Flowers: Lawn Fawn ink in Cranberry, Chili Pepper, Guava, and Wildrose.

After I stamped the images, I die cut them using their coordinating dies. A tip for stamping the birds: stamp the bird bodies, die cut them, then stamp the feet. That way, the feet will line up with the die cut.

To add a bit of dimension, I grabbed my Tonic Ebony Black Nuvo Crystal Drops and used it on the birds’ eyes. This was actually my first time using the Nuvo Crystal Drops and I should have tried it on scrap paper first but I didn’t and ruined 2 of my birds and had to restamp them. Eventually, I got the hang of it and it turned out good! I set them aside to dry.

Next, I took the die cut branches and placed them into my pop up card base with
acetate. I then proceeded to adhere all the leaves, flowers, and birds to the branches with my ZIG Two Way Glue Pen.

For the sentiment, I die cut the second smallest circle from
MFT Stitched Mini Scallop Circle Stax Die-namics and heat embossed with sentiment, “Sending a bit of cheer”, in blue tinsel embossing powder by Recollections and adhered it to the front panel flap.

I turned the card over and added two leaves and a flower to the back of the card where people can write their own message. Lastly, to finish up the card, I took my Spectrum Noir Sparkle Clear Overlay Pen and just brushed the flowers with a bit of sparkle.

You can watch it in action here:

thumb_IMG_7239_1024

This card was also entered in Simon Says Stamps Wednesday challenge.

So that finishes up day 7 of the 30 day colouring challenge. Check out supplies below, if you’re interested. I’ll be back tomorrow with more!!

thumb_IMG_7238_1024

Etsy Shop Update & Mix and Match Stamp Set Project Day…

Due to a labour dispute, Canada Post will be going on strike July 2! This deeply saddens me as I will have to put my Etsy shop on hold for the time being until things are resolved. On the bright side, this will give me time to make more inventory. Look forward to seeing new stuff on my shop once the strike is over! If you would like to see what I’m up to please follow me on Instagram @ 12bpanda. If anybody would like to see anything in particular in my shop, please let me know.

So I bought the Simon Says Stamp (SSS) Circle Friends stamp set and coordinating tri circle craft die a while ago and had a few ideas for it. I find myself using the stripe background and the heart quite a bit. I haven’t used the characters in the set yet, but instead I have been using this set in conjunction with Mama Elephant stamp sets I own. I love this Tri Circle Craft die. I treat the cut out circles like windows for the animals to inhabit and peak through. The size of the characters in the Mama Elephant stamp sets make them perfect for this.

This is the first card that I made with this set.

thumb_IMG_5654_1024

I stamped out and fussy cut the hearts from the Circle Friends stamp set. I used a Versamarker (it’s Versamark in marker form) and red glitter embossed the hearts. I supposed I could have just pressed the hearts face down onto a Versamark ink pad but I didn’t want the black ink outline on the hearts to get covered by embossing powder. The card front was just cut slightly smaller than an A2 size with the bottom corners rounded off with a corner chomper and the circles were die cut out. I placed the card front over the card base and lightly drew in pencil where the circles were going to be so I would know where to stamp. I stamped the striped background on the card base within my light pencil lines with Onyx Black Versafine ink. Stitch lines were drawn on the card front with a white gel pen. I made a little bow using a Mama Elephant die. The striped pattern on the bow is actually the same stamp that I used to make the striped background for the hearts. I assembled the bow and adhered it to the card front. The card front and hearts were mounted to the card base using 3M foam adhesive.

birthday card- 3 penguin 3 wm
Featuring Mama Elephant’s Arctic Penguins and Carnival Toppers. The background stripes were stamped with Lawn Fawn’s Walnut dye ink.
thumb_IMG_6206_1024
Featuring Mama Elephant’s Pandamonium, presents from Wplus9’s Holiday Hugs, banners from SSS Baby Party Animals, and party hat from Mama Elephant’s Carnival Toppers. The background stripes were stamped in Lawn Fawn’s Blue Jay.

These two cards were made in a similar fashion. I ran the card front through my Cuttlebug with a Cuttlebug birthday embossing folder that I found on Amazon. It’s a bit ridiculous right now though. I honestly bought it for like $4 or $5? It’s being listed right now for $44. I’m sure it’ll be a different price when you guys look. Amazon’s funny, the prices change every day!  I added Wink of Stella Clear Glitter to these cards too that the camera was unable to pick up (in the stars on the penguin card and on the banner flags on the panda card).

That’s all I have for now. Hope you guys have a great night! Products listed below for those who are interested, as per usual.


MFT Camp Create: Day 3- Wonderful Watercolor Challenge

I really like water colouring  embossed floral stamps from those stamp sets that just have the outlines of the flowers. I don’t own any MFT ones :/… Frankly, I only own two sets- one by Simons Says Stamp shown here and one that I just received in my last happy mail order by Wplus9. So for this challenge, I guess I’m going to use my new one! When I bought it, I had a hard time choosing whether to buy the ranunculus, dahlia, or mum bouquet but I ended up getting the dahlia. I really like all three flower stamps, they’re quite big in size (3 1/2 x 3 1/4 inches) so they are a good focal centre piece on a card.

thumb_IMG_6228_1024


I die cut the water colour panel with MFT’s Wonky Stitched Rectangle and stamped and heat embossed the dahlia stamp with white embossing powder. I water coloured the image with Distress Ink. I used a combination of festive berries, abandoned coral, spun sugar, and picked raspberry for the dahlias. The leaves were done with twisted citron, cracked pistachio, and evergreen bough. Tumbled glass was used for the background. After it was dry, I took a sentiment from Hero Arts’ For You Flowers stamp set and stamped and heat embossed the sentiment, “hello beautiful” with rose gold embossing powder. I quickly finished off the card by adhering it to an A2 sized pink card front and onto the card base.

Woot! Day 3 of Camp Create done! Tomorrow’s focal point is die cutting! I’m not sure what I’m going to make yet but I’m looking forward to it.