Mama Elephant Arctic Penguins Christmas Box Pop Up Card

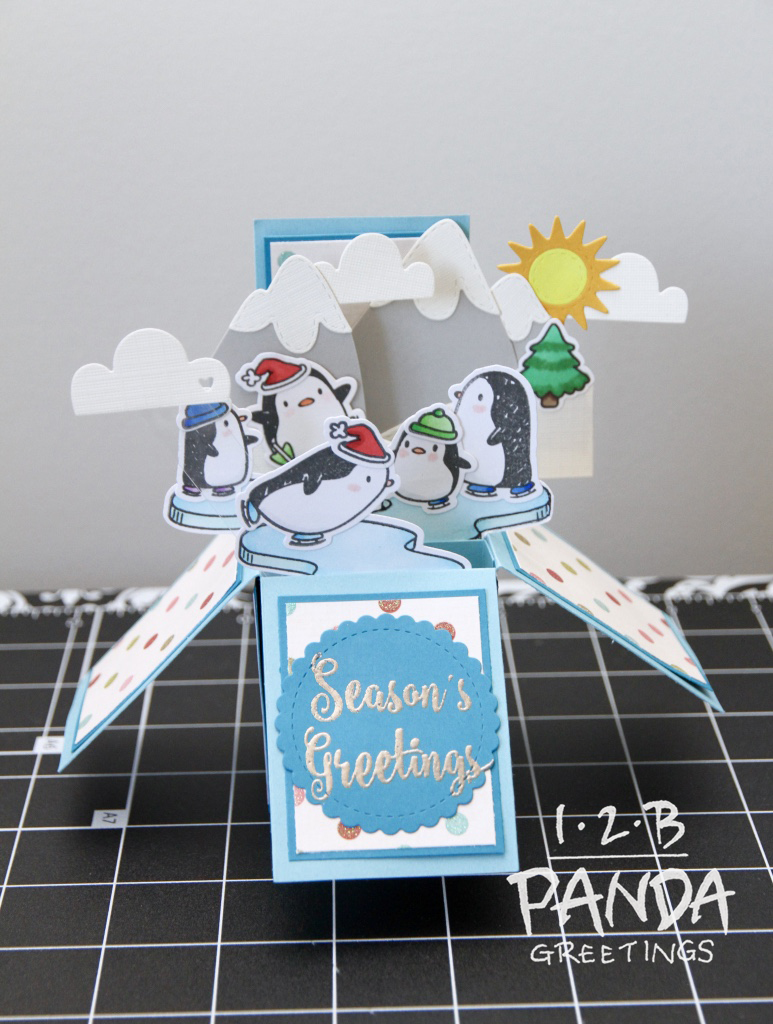
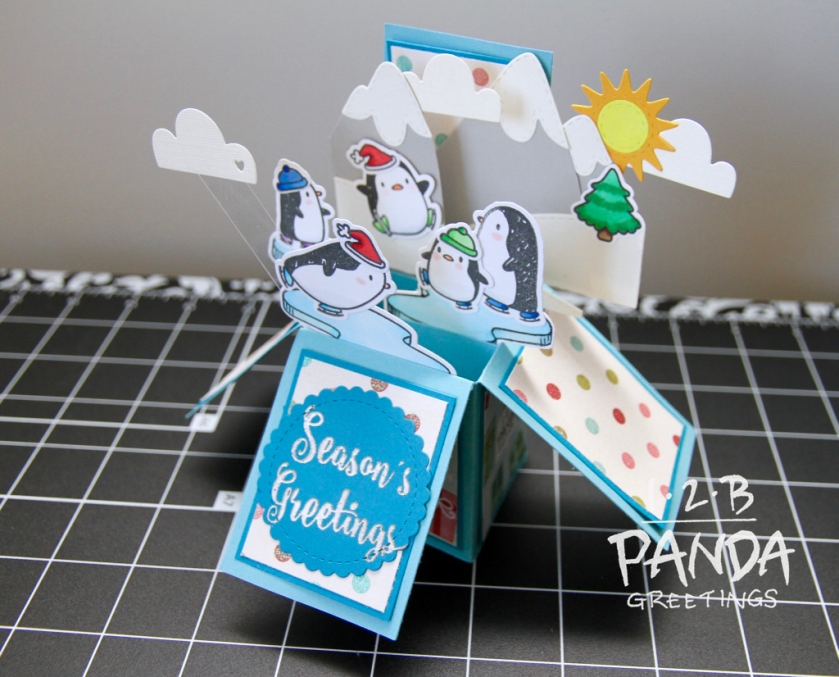
This is my last card for 2016! Why not end the year with something awesome!?! I love Mama Elephant’s Arctic Penguins. It was actually one of the first stamp sets I bought when I wasn’t sure if I’d like card making but figured I would buy a few things and give it a try. Lo and behold, I LOVE IT!

This past year, I’ve been playing around with different techniques and really trying to find something that’s my niche. I’ve had an overwhelming response for my box pop up cards. Thank you to everyone that contributed to helping me figure out what I should do more of next year! Designing more box pop up cards, learning how to improve upon my watercolour painting, and becoming proficient with brush calligraphy are on my list for next year!

thumb_img_7082_1024

thumb_img_7085_1024

thumb_img_7089_1024

For this card, I started out by making the box base. You can find those instructions here. UPDATE MARCH 13, 2017>>> or watch my Youtube video below.

Next, I stamped and coloured the penguins and ice with Copic markers, then die cut them with their coordinating dies. I did a mirror image stamp of the large ice using MFT’s Mirror Image Clear Stamp. Basically, I put it in my MISTI tool and stamped the ice three times in the same spot on the mirror image stamp with Onyx Black Versafine Ink, then stamped the mirror image block on my piece of paper. The ink transferred well onto the paper and I just cut the image out with scissors.

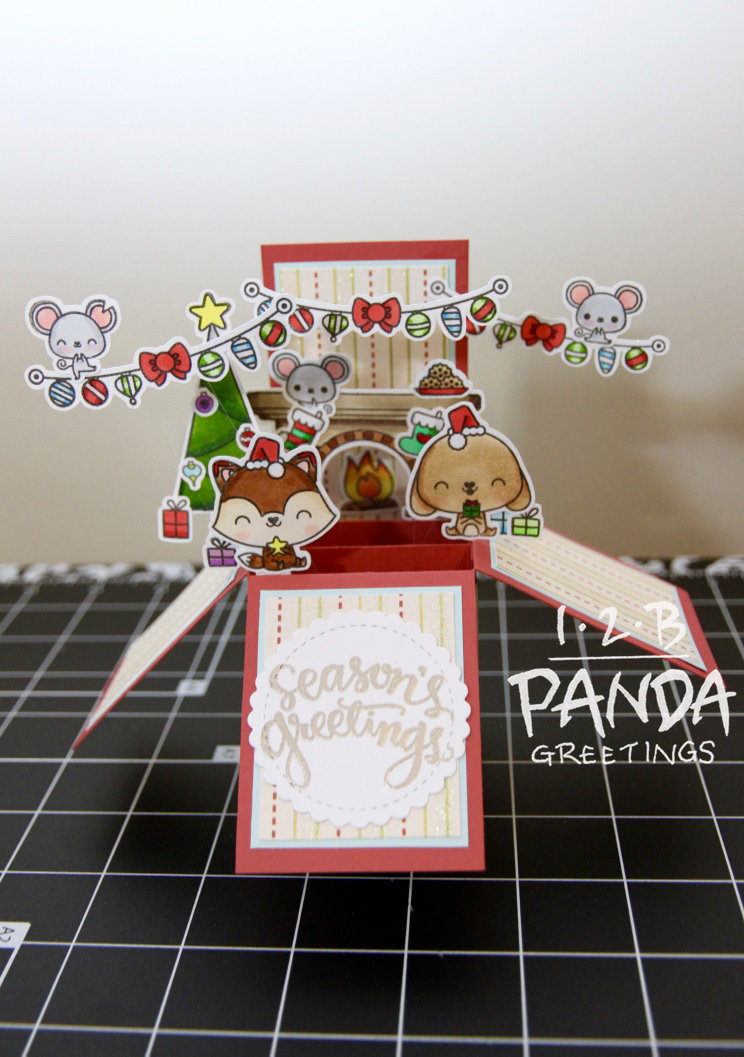
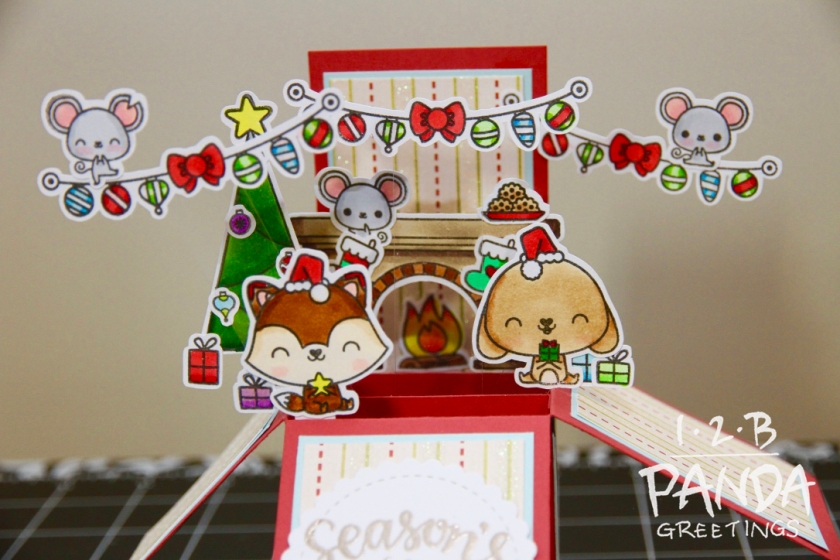
I also stamped and coloured a tree from the Reindeer Games stamp set and used the “Season’s Greetings”, sentiment from Mama Elephant’s Christmas Scene stamp set. The sentiment was stamped with Versamark and heat embossed with Ranger Embossing Powder Liquid Platinum.

I die cut a few other things too while I had my Cuttlebug out. I’ll just list them so it’s easier to read…

Hills: Mama Elephant Landscape Trio
Mountains: Mama Elephant Snow Capped Mountains Creative Cuts
Clouds:  Rainbow High Creative Cuts
Sun: Wplus9 Sunshine layers die set
Sentiment housing: the second smallest scalloped circle from MFT’s Stitched Mini Scallop Circle Stax Die-namics

I adhered everything onto the card and finished the card by brushing my
Spectrum Noir Sparkle Clear Overlay Pen on the penguin accessories and ice to give it a nice shimmer. If you’ve been following me for the last few months, you might have noticed that I use this pen on like every card! It’s because I love it that much! The subtle shimmer just gives cards an extra little something special.

thumb_img_7092_1024

You can see it in action here:

>>>>UPDATED NOV. 24, 2017!!! I managed to film and edit a Youtube Process Video so check that out!

This card was also entered in Simon Says Stamp’s Monday Challenge and Wednesday Challenge.

Anyways, that’s all from me for this year. I hope you all have a fabulous holiday season! I’ll be back in the new year with some new awesome stuff!

Lawnscaping Challenge #144-Frosty Fairy Friends Winter Card

ls144

I’m really loving Lawn Fawn’s Christmas release and I’m excited to see what they will come up with in the new year!! This week’s Lawnscaping theme is, “Christmas”. Unfortunately, this will be the last challenge they will be hosting so please join in for a chance to win a stamp set of your choice from Lawn Fawn. You can find details chance to win a stamp set of your choice from Lawn Fawn here.

thumb_img_7094_1024

I’ll be using the Frosty Fairy Friends stamp set for this challenge. I started out my card by stamping out the fairies and the house and coloured them with Copic markers .

After I finished colouring the images, I die cut them using their coordinating dies, then proceeded to cut all the other pieces I needed, since I had my Cuttlebug out anyways. I used Lawn Fawn’s Stitched Mountain Border, Stitched Hillside BorderStitched Tree Border, and MFT’s Single Stitch Line Rectangle Frames. The frame was cut out of a page in the  Perfectly Plaid Christmas Petite 6×6 Paper Pack. When I buy supplies, I don’t usually buy patterned paper because I would rather spend money on new stamps or dies, but I absolutely love Lawn Fawn’s plaid paper packs! The patterns and colours are beautiful and the paper itself is nice and thick.

Anyways, while I still had my Cuttlebug out, I cut a piece of light blue card stock to 4.25″ x 5.5″ and then ran it through using the We R Memory Keepers Gemstone Next Level Embossing Folder. I used the folder that looked like crumpled paper. The Next Level Embossing Folders are a bit thicker so I had to play with my stack to get it to work in my Cuttlebug. Normally for embossing you use 1 A plate and 2 B plates but I found it was too thick to run through my machine. I found the best stack for me was: A PLATE-B PLATE-NEXT LEVEL EMBOSSING FOLDER-REGULAR EMBOSSING FOLDER.

I then proceeded to position everything on my card front and adhere it with 3M Foam Tape so it had more dimension. Lastly, I adhered my card front to my card base with some a tape runner adhesive, added some clear sparkling sequins, and brushed the fairy wings with Spectrum Noir Sparkle Clear Overlay Pen.

Update: Feb. 25, 2017- I got around to editing the footage for a Youtube video, so you can check that out here!

That finishes up my card for this challenge. I have one more holiday card in the works so I will be back shortly with that.

Ink Blended Jingle Snowflake Christmas Cards

I’m just squeezing a few more Christmas cards out while I still can before Christmas. I saw someone do something similar to this so I decided to take inspiration from it and make it in other colour variations.

thumb_img_7101_1024

The colour combinations of Distress Ink I used were

Mustard Seed, Carved Pumpkin, Abandoned Coral
Twisted Citron, Cracked Pistachio , Mermaid Lagoon
Tumbled Glass, Mermaid LagoonChipped Sapphire
Spun SugarAbandoned CoralCandied Apple
Milled Lavender, Dusty Concord, Chipped Sapphire

I ink blended the panels using Ranger Ink Blending Tool and cut the panel down to slightly smaller than 4.25″ x 5.5″. Two of the cards I just left as the smooth ink blended panel. The other three, I sprayed with some water, dabbed it off, then smeared the darkest ink onto a slick surface, sprayed it with a bit of water, picked it up with a small paint brush and flicked the dark ink onto the panel.

I cut 2 pieces of the Simon Says Stamp Jingle Snowflake Wafer Die for each card, out of 110lb paper and adhered them together. I found using a metal adaptor plate quite helpful in cutting the intricate die.

I positioned the die cuts onto the card so I had a general idea where to stamp the sentiment. I used “Joy to the world”, from Simon Says Stamps Peach On Earth stamp set. I stamped the sentiment with VersaFine Onyx Black Ink Pad and quickly sprinkled some WOW Clear Gloss Embossing Powder on it and heat set it.

Next, I adhered the die cut pieces and some Pretty Pink Posh Sparkling Clear Mix Sequins to the panel. I flipped the panel over and used 3M Foam Tape all over the back of the panel to give it a bit of dimension. I adhered the panel to a piece of white cardstock cut to 4.25″ x 5.5″ finished it by gluing it to my card base.

thumb_img_7103_1024

I entered these cards in Simon Says Stamp Monday challenge, which you can find here.

That’s all from me for now, I’ll be back shortly with my last couple Christmas cards for the year.

30 DAY COLORING CHALLENGE @ THE DAILY MARKER: DAY 30

challenge_graphic-nov16_16x24

IT’S DAY 30!!!!! I MADE IT TO THE LAST DAY! So here’s something special for the last day…

I’m really liking box pop up cards, except for the fact that they take me so long to make! I acquired some of Mama Elephant’s Christmas release when they did their birthday sale last month and I have to say, my favourite set this release is Merry Mantel. This is what I came up with:

thumb_img_7070_1024thumb_img_7071_1024

I’m really liking scene building these days. I love how box cards give me four layers to work with. Dimensions and how I construct my box bases can be found  here. UPDATE: MARCH 13, 2017>>> OR watch my Youtube video below.

I stamped all my images with Simon Says Stamp Intense Black Ink then coloured them with Copic markers .

Images were from the following stamp sets:
1. Merry Mantel: the mantel, stockings, plate of cookies, fox, hound, and strings of ornaments.
2. Tandem Ride: Mice
3. O’Tiny Tree: Presents
4. Christmas Scene: Tree, star, and tree ornaments

I used the second smallest of MFT’s Stitched Mini Scallop Circle dies and heat embossed “Season’s Greetings”, from SSS Peace On Earth stamp set with Liquid Platinum Embossing Powder.

As usual, I finished my card by brushing the ornaments and presents with my Spectrum Noir Sparkle Clear Overlay Pen.

You can watch it in action here:

thumb_img_7073_1024

This card was also entered into Simon Says Stamps Monday Challenge found here.

UPDATED: NOV. 6, 2017. I remade this card and filmed it. Check out my Youtube Video!

That finishes my last entry for the 30 Day Color Challenge and guess what? 25 DAYS UNTIL CHRISTMAS!! The countdown is on…