Etsy Shop Update & Mix and Match Stamp Set Project Day…

Due to a labour dispute, Canada Post will be going on strike July 2! This deeply saddens me as I will have to put my Etsy shop on hold for the time being until things are resolved. On the bright side, this will give me time to make more inventory. Look forward to seeing new stuff on my shop once the strike is over! If you would like to see what I’m up to please follow me on Instagram @ 12bpanda. If anybody would like to see anything in particular in my shop, please let me know.

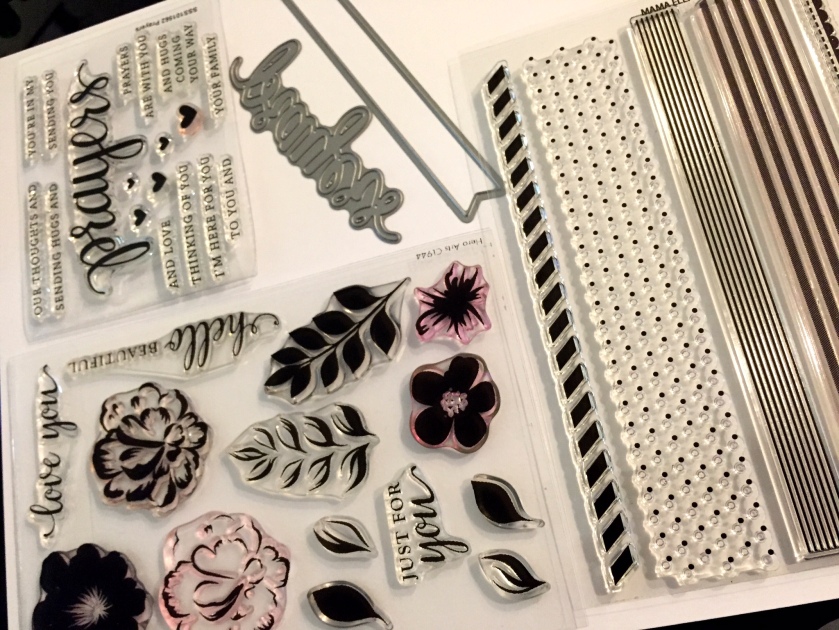
So I bought the Simon Says Stamp (SSS) Circle Friends stamp set and coordinating tri circle craft die a while ago and had a few ideas for it. I find myself using the stripe background and the heart quite a bit. I haven’t used the characters in the set yet, but instead I have been using this set in conjunction with Mama Elephant stamp sets I own. I love this Tri Circle Craft die. I treat the cut out circles like windows for the animals to inhabit and peak through. The size of the characters in the Mama Elephant stamp sets make them perfect for this.

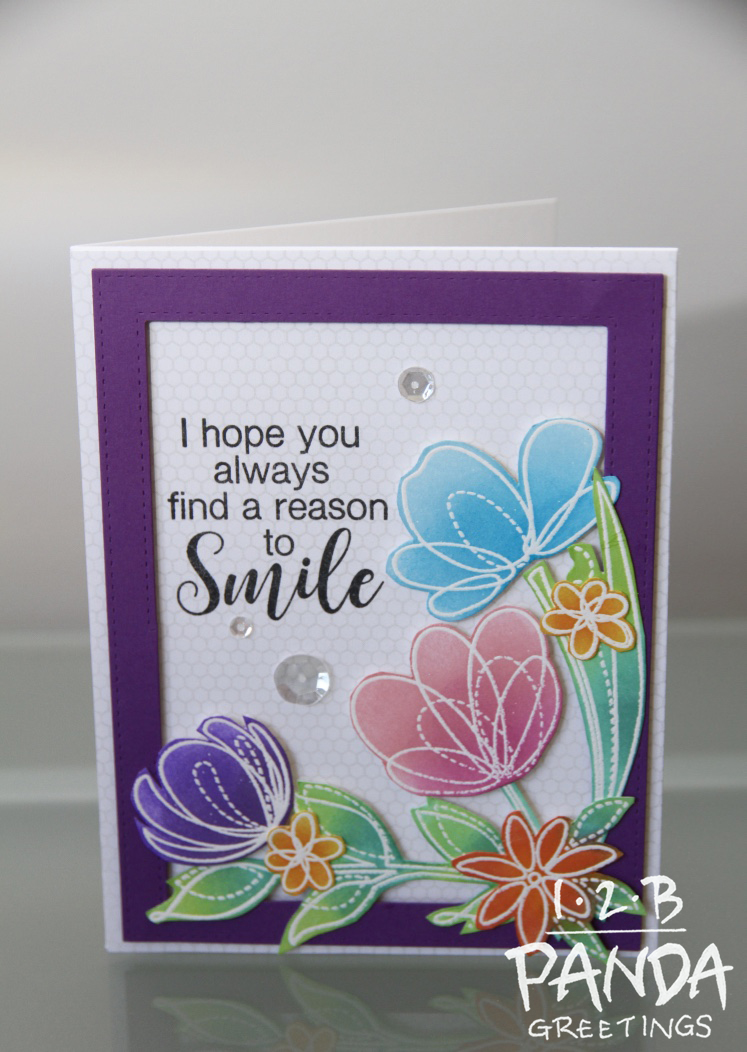
This is the first card that I made with this set.

thumb_IMG_5654_1024

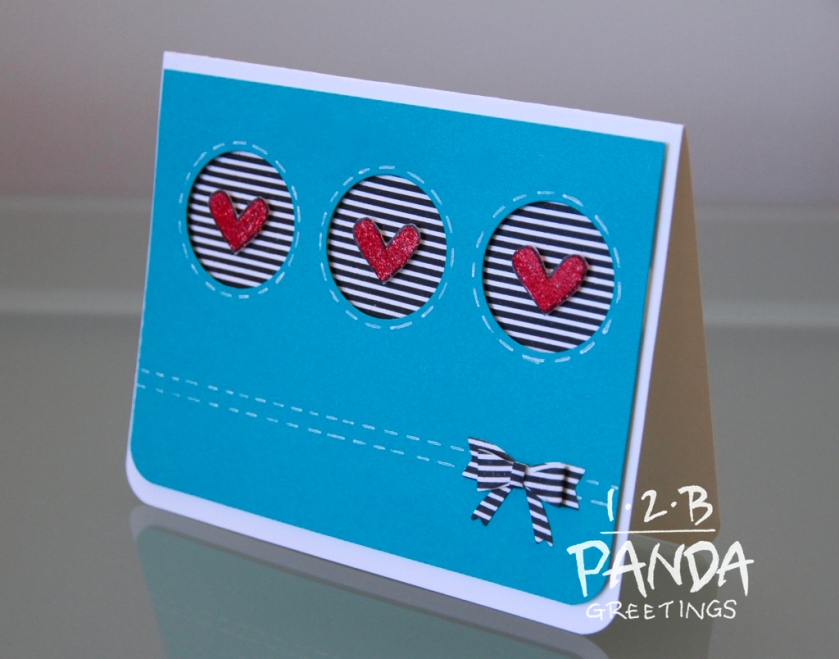
I stamped out and fussy cut the hearts from the Circle Friends stamp set. I used a Versamarker (it’s Versamark in marker form) and red glitter embossed the hearts. I supposed I could have just pressed the hearts face down onto a Versamark ink pad but I didn’t want the black ink outline on the hearts to get covered by embossing powder. The card front was just cut slightly smaller than an A2 size with the bottom corners rounded off with a corner chomper and the circles were die cut out. I placed the card front over the card base and lightly drew in pencil where the circles were going to be so I would know where to stamp. I stamped the striped background on the card base within my light pencil lines with Onyx Black Versafine ink. Stitch lines were drawn on the card front with a white gel pen. I made a little bow using a Mama Elephant die. The striped pattern on the bow is actually the same stamp that I used to make the striped background for the hearts. I assembled the bow and adhered it to the card front. The card front and hearts were mounted to the card base using 3M foam adhesive.

birthday card- 3 penguin 3 wm
Featuring Mama Elephant’s Arctic Penguins and Carnival Toppers. The background stripes were stamped with Lawn Fawn’s Walnut dye ink.
thumb_IMG_6206_1024
Featuring Mama Elephant’s Pandamonium, presents from Wplus9’s Holiday Hugs, banners from SSS Baby Party Animals, and party hat from Mama Elephant’s Carnival Toppers. The background stripes were stamped in Lawn Fawn’s Blue Jay.

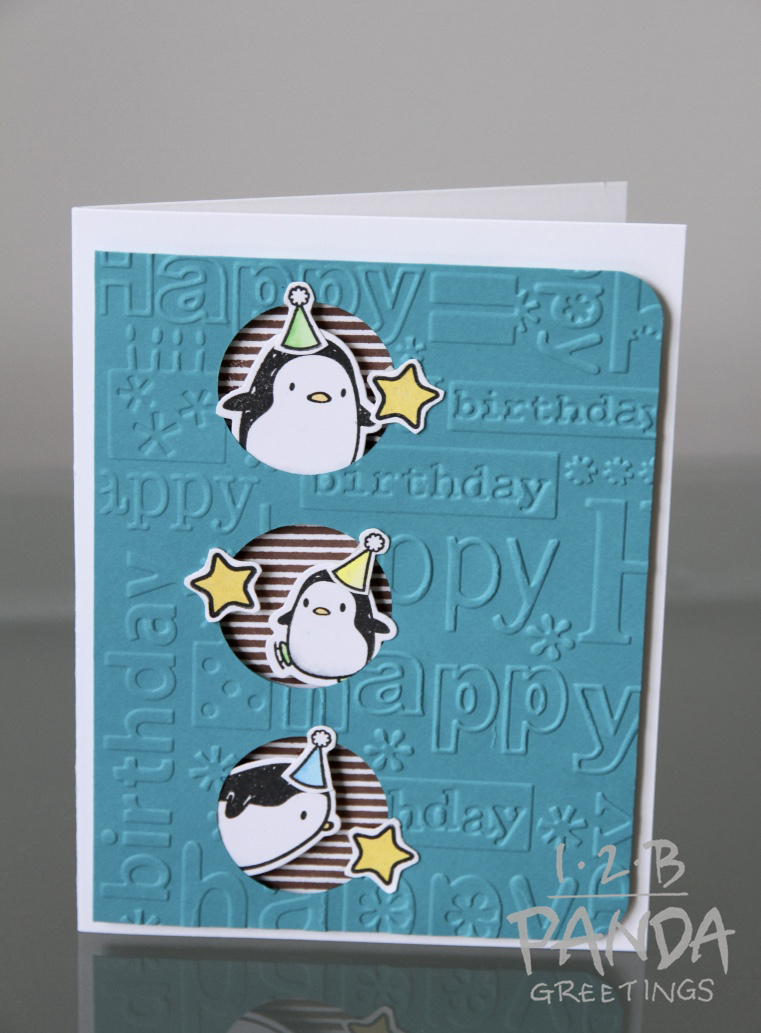
These two cards were made in a similar fashion. I ran the card front through my Cuttlebug with a Cuttlebug birthday embossing folder that I found on Amazon. It’s a bit ridiculous right now though. I honestly bought it for like $4 or $5? It’s being listed right now for $44. I’m sure it’ll be a different price when you guys look. Amazon’s funny, the prices change every day!  I added Wink of Stella Clear Glitter to these cards too that the camera was unable to pick up (in the stars on the penguin card and on the banner flags on the panda card).

That’s all I have for now. Hope you guys have a great night! Products listed below for those who are interested, as per usual.


Stamp Spotlight: SSS Spring Flowers

I acquired the Simon Says Stamp (SSS) Spring Flowers stamp set during a sale earlier this year. What can I say about Spring Flowers? You can never have enough floral stamp sets hahaha… This one is nice though because its just the outline of the flower and stems with like stitched accents. This set is great for water colouring and ink blending.

I decided to work on my water colouring for the two cards below. Both were painted using Distress Ink.


Left: heat embossed with white embossing powder prior to water colour painting and painted with Candied Apple, Carved Pumpkin, Mustard Seed, Twisted Citron, Mowed Lawn, and Lucky Clover

Right: heat embossed with gold and painted with Tumbled Glass, Twisted Citron, Mowed Lawn, Spun Sugar, Milled Lavender, and Wilted Violet

I also decided to do some ink blending with this stamp set. I spent a bit more time making this card as I had to fussy cut all the flowers out. SSS just recently released the coordinating dies for this set. I don’t have them yet but it would definitely save time if I had them.

thumb_IMG_5820_1024

Here’s how I made this card:

  1. Cut out white card base to A2 size and stamp background using MFT’s Mini Hexagon Background in light grey ink. I used Mama Elephant’s Moonlight.
  2. Die cut border with purple  card stock. I used MFT’s Vertical Stitched Cover Up Companion and cut out the middle section and adhered it to my card front with 3M foam adhesive.
  3. Stamp and white heat emboss floral images and leaves and stems and fussy cut them out.
  4. Ink blend cut out pieces. I used Twisted Citron, Cracked Pistachio, Lucky Clover, Dusty Concord, Shaded Lilac, Carved Pumpkin, Mustard Seed, Abandoned Coral, Picked Raspberry, Spun Sugar, Salty Ocean, and Tumbled Glass.
  5. Positioned cut out elements and adhere them with 3M foam adhesive to card front.
  6. Stamp sentiment and adhere sequins.

For the sentiment I used Simon Says Stamp Choose Happy stamp set. SSS always makes awesome sentiment stamp sets! The Choose Happy stamp set is full of unique sentiments such as,”Do things that make you happy within the confines of the legal system” and, “I hope you always find a reason to smile”. The sentiments are vague enough so they can be used for a variety of occasions like birthday cards and just because cards. Love it!

That’s all from me for today. I hope you guys liked the cards! Have a fabulous weekend. Like always, links below for products I used if anybody is interested.


https://linkdeli.com/widget.js

Lawn Fawn Summer Release Haul and Review

Happy mail came for me few days ago. I WAS SO EXCITED! This particular order had a few items from Lawn Fawn’s summer release including the Mermaid For You stamp set, coordinating dies, Slide On Over dies, and the new inks: chilli pepper, guava, and blue jay. Ever since I saw the preview for the release I had my eye on the mermaid set!

thumb_IMG_3842_1024

I love it when companies release sets that coordinate well with previously released sets (ie. Fintastic Friends and Jelly Star). What’s great about this set is that it’s so unique! I haven’t seen a mermaid stamp set quite like this one on the market yet.

thumb_IMG_3849_1024

The mermaid characters were drawn in a very cute style and come with  accessory stamps to dress up them up. In addition to that, Lawn fawn has even included a cute seahorse, narwhale, several scene building stamps (coral, seaweed, large rock, and fish), and a couple pun filled sentiments: “We mermaid for each other”, “Sea you soon”, and “Waving hello”. I’ve kind of been working on scene building lately  and I don’t have many other sets that can build ocean scenes with so the Mermaid For You set is a great start!

thumb_IMG_6028_1024


Another thing that I was really excited about was playing with the Slide On Over dies (partially pictured in the first photo, on the right). I LOVE INTERACTIVE CARDS!!  This is a great use for pennies except too bad Canada got rid of pennies in 2013!! I thankfully have a handful of American pennies to try this with from my last trip to Florida! Lawn Fawn nicely included sliding slots for both long and short straight and curved tracks and one partially and one really curvy track. So far I have only had time to made one but I am really looking forward to making more of these interactive cards. Check it out in action below.


Lawn Fawn also added three new inks to their collection: Guava, Chili Pepper, and Blue Jay.

Compared to other inks in their collection, Guava’s kind of a slightly darker, bolder Wild Rose and Chili Pepper is like a cross between Cranberry and Lobster. These two new ink additions would be really useful for layering stamps. I really like Blue Jay. It’s a beautiful royal blue and a great addition to their colour collection. Here’s what they look like in comparison to similar colours in their collection.

thumb_IMG_3872_1024

I’m super excited to start playing more with my new stuff! Look forward to a tutorial in the future! If anybody is interested in anything in this post, the links are below.

Stamp Spotlight: Lawn Fawn- Rooting For You

The Rooting For You stamp set was part of Lawn Fawn’s Spring release this year. I guess I’m a bit late writing about it but I didn’t have my blog at that point in time. I only allowed myself to buy one new stamp set out of their spring release and I chose this set because it was absolutely adorable! I loved that they were layering stamps and that you could add cute little expressions to them. The stamp set comes with a carrot, radish, beet, turnip, their associated leaves, facial expressions, watering can,  vegetable markers, and 2 sentiments (I’m/we’re rooting for you; Have an upbeet day). I wish there were more pun filled vegetable related sentiments in the set but other than that, I have no qualms.

thumb_IMG_3819_1024
Lawn Fawn Rooting For You Stamp set and coordinating dies

It’s kind of funny, for the longest time I didn’t realize what the two black circles were at the bottom of the stamp set (It’s not just me, right?).  It suddenly came to me one day that they were the rosy cheeks for the vegetables. Love it! The rosy cheeks add such a great extra touch to the facial expressions of the vegetables.

So I decided to make some birthday cards with this set.

birthday beets wmbirthday carrots wmbirthday radishes wm

The radish birthday card is my favourite out of the three and unfortunately, the photo does not do it justice as there’s fine sparkles on the “happy” text as well as the water droplets and cloud. This is how I made the radish card:

  1. Cut green card stock to make card front to A2 size (5.5″ x 4.25″) using stitched die. Heat emboss star background with gold embossing powder. I tried to find the stamp set that the tiny stars were from and I wasn’t able to find. It is a Lawn Fawn set called Teeny Tiny Backgrounds but I think it may have retired.thumb_IMG_3822_1024
  2. With brown card stock, die cut simple stitched hillside border then take A2 size stitched rectangle die and die cut bottom and side edges as to add the stitched lines on the outer edge.
  3. Cut white card stock panel slightly smaller than 4.25″ wide, just enough to be able to see the embossing on the green card stock. Emboss the white card stock with chevron embossing folder and use A2 sized stitched rectangle die to make stitch lines on top edge of white card stock. Adhere to the green card stock in the centre of panel. I was unable to find this embossing folder too! It’s an embossing folder by Lifestyle Crafts and I think it also retired! 😦 How unfortunate.thumb_IMG_3823_1024
  4. Stamp out and die cut watering can, radishes, leaves, and vegetable marker. Adhere the leafy part of the radish to the radishes.
  5. Die cut  “happy” letters, birthday script, stitched sun, cloud,  and water droplets.
  6. Position hill side on card front and use dimensional foam adhesive to adhere to card front for added dimension.
  7. Position other elements on card front. Glue sun, cloud, birthday script, vegetable marking, bottom radish, and “happy” letters to card front.
  8. Adhere watering can, water droplets and 2 radishes to card front on dimensional foam adhesive. You will need to cut them to made it fit the water droplets.
  9. Use clear Wink of Stella glitter pen and brush over water droplets and “Happy” letters.
  10. Adhere card front to card base using tape runner adhesive.

So that concludes my card. I have listed my supplies below for anybody interested. Lawn Fawn’s summer release was last week and I am so excited!! I ordered the Mermaid For You stamp set and I am really looking forward to working with it! I really wish shipping to Canada from the U.S. didn’t take so long. On the upside, there’s a coupon code right now for $5 off any purchase of $5 or more at Simon Says Stamp. Coupon Code:”Breezy” at checkout (valid until June 14, 2016)!

So that’s all from me for now. Hope you guys are having a fabulous May long weekend!

Stamp Spotlight: Hero Arts- For You Flowers

Continuing from the last post, I had cut the water colour panels out for those thank you cards and I was left with a frame. I didn’t want the frames to go to waste so I decided to use them for these cards.

I ink blended the frames with just one colour. I used carved pumpkin (orange), picked raspberry (pink), and peacock feathers (bluish green) Distress inks and then sprayed them with water to get that water droplet effect.
I had recently acquired this Hero Arts layering flower stamps on a recent order and decided to give them a try. I’m kind of still new to this whole card making thing and layer stamps have probably been around for a while, but I’m still in awe every time I use them. I just think they’re are so neat and the finished product looks so great! Each card I did was kind of the same but a little bit different. So I stamped all the flowers with a variety of Lawn Fawn inks (Except the light blue is Hero Arts). I’m just using what ink I have on hand.
I die cut the stamped images and played with the arrangement of them until I was happy. I used a bit of adhesive to stick the flowers together so I wouldn’t lose my arrangement. I took a piece of white card stock and cut it to an A2 size (5.5″x 4.25) and stamped a border pattern using Mama Elephants Boutique Borders set 2/3’s of the way down the panel. You can just do it directly on the card base but out of personal preference, I like doing a separate card front and then adhering it onto the card base.

IMG_3597

I die cut my banners out, as well as the prayers and totally fabulous text. You don’t necessarily need a banner die to do this. You can also just cut a fish tail into a strip of paper by making a small cut in the centre then making 2 diagonal cuts from the corners that meet at the centre.

The prayers stamp set is a great one to have. It’s a Hero Arts set that comes with the prayers word stamp and sentiments,  as well as heart stamps that come in a variety of sizes. It also comes with a coordinating prayers word die. Twenty five percent of the profits from this set go to the “Lasting Hearts” Fundraiser and Card Drive. It’s a charity for mothers who have lost a child to miscarriage. For more information, please see here.

I kind of went a tangent there, back to how I made these cards. The prayers word I die cut 3 times and adhered them together so it would be thicker and add a bit of dimension to the card. I then heat embossed the “And hugs coming your way” sentiment on the blue card and the “Hey beautiful”on the banner or the orange card using liquid platinum by Ranger. I took 3M foam adhesive and adhered my frames, flowers and banners in place to create dimension and just used Tombow Mono Multi glue (it’s liquid glue but you can use whatever you have) to adhere the prayers word. I adhered the sequins on the hey beautiful and totally fabulous card with the same liquid glue then mounted the card fronts onto the card bases using a tape runner adhesive.

If you’re interested in any of the supplies I used in this post, I have linked them below.

That’s all from me for now, hope you guys have a great day!

http://static.inlinkz.com/ppr.js

For my Canadian friends, if you can’t find Distress ink at your local Micheals, you can buy some on Amazon.ca!