Mama Elephant Little Fairy Agenda Wiper Card

Hey Everybody!!!

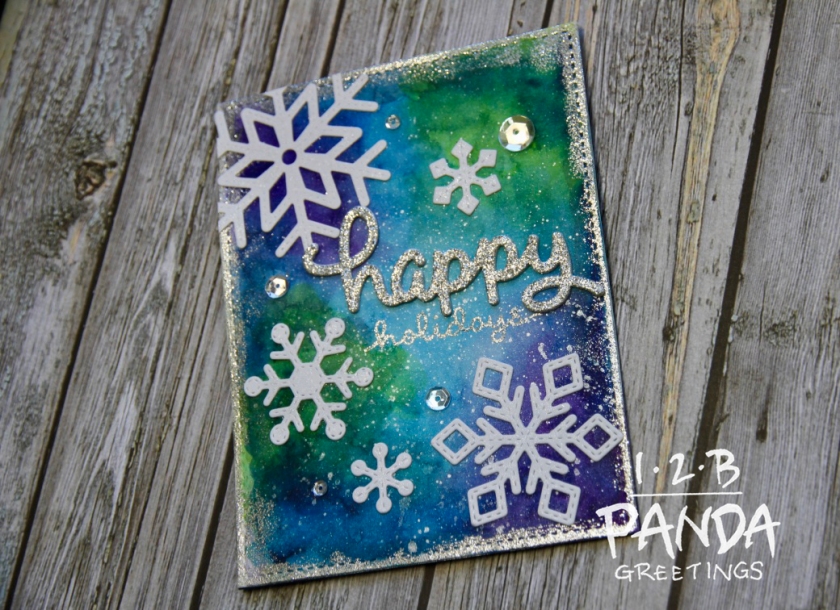
The 30 Day Colouring Challenge is actually going on right now again. I had originally stamped the Mama Elephant Wild Meadow Stamp to practice colouring with my Zig Clean Colour Real Brush Markers, which lead to the making of my FIRST WIPER CARD!!

challenge_graphic_april_may_20_650

I bought Mama Elephant’s Wiper Surprise Die late last year and I’ve been really itching to try and figure it out. When I saw the demos on Youtube I didn’t really get how it worked and figured that I really just needed to sit down and play with the mechanism.

This is what I came up with:

Screenshot_20200415-200506_2

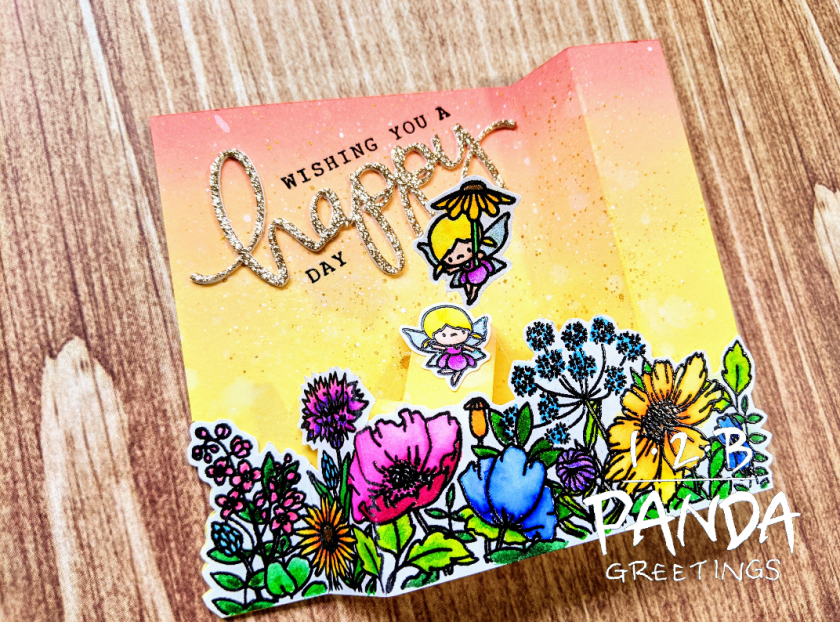
The floral Wild Meadow Stamp and two of the fairies from Mama Elephant’s Little Fairy Agenda were stamped with Versafine and heat embossed with WOW Clear Gloss Embossing Powder on 140lbs watercolour paper. In no particular order, I use the following Zig Clear Color Real Brush Markers and a water brush to colour the images:

-Faires: 051 Lemon Yellow, 050 Yellow, 052 Bright Yellow, 082 Purple, 069 Blush, 083 Lilac, 303 Shadow Mauve, 004 FL. Green, 071 Flesh Color, 065 Mid Brown. I also used Lawn Fawn Prisma Glitter on the fairy wings.
-Flowers: 260 Deep Red, 027 Dark Pink, 202 Peach Pink, 026 Light Pink, 070 Orange, 052 Bright Yellow, 050 Yellow, 051 Lemon Yellow, 053 Yellow Green, 044 Deep Green, 047 May Green, 048 Emerald Green, 030 Blue, 031 Cobalt Blue, 036 Light Blue, 081 Light Violet, 080 Violet, and 056 Mid Brown

I die cut pieces for the wiper card out of the same watercolor paper. I fussy cut the images out with my Cutterbee Scissors and trimmed the panel to match the length of the floral image.

I ink blended the wiper panel with Distress Oxide Inks Squeezed Lemonade, Dried Marigold, and Abandoned Coral. I sprayed the panel with water and spattered it with diluted Copic Opaque White and Arabic Gold from my Finetec palette.

I assembled the wiper card using Score Tape. After assembling the mechanism, I realized that the right sided fairy kept catching on the floral border so I cut the wiper mechanism and added a strip of acetate.

To finish up the card I die cut Mama Elephant’s Happy Script die twice out of 110lb white card stock and once out of a warm gold glitter card stock and adhered them together. I stamped, “Wishing you a”, and ,”Day”, before and after the happy script using Mama Elephant’s Happy Everything Stamp set in Versafine and heat embossed with WOW Clear Gloss Embossing Powder.

You can check it out in action here:

That finishes up my card, I hope you guys liked it. If you want to join in on the fun, you can check out the details of the 30 day colouring challenge
here. This card was also entered into Simon Says Stamps
Monday Challenge.

Thanks for stopping by!

Waffle Flower Cheers Ink Smooshed Birthday Card

I recently bought the Waffle Flower Cheers stamp set. It was actually a combo pack with the coordinating dies and the Rainbow die. I thought it was the perfect summer birthday set and the price point was great! I’m not using the rainbow in this card but I will in my next card!

salt_20190508_221130_219

For this card, I decided to do some ink smooshing. I haven’t done this technique in a while and I felt like if I ink smooshed a bunch of blues and greens, it would make a nice water background to compliment the cat on his floatation device.

I stamped the cat in Hero Arts Intense Black ink and coloured it with the following Copic colours: Y38, Y35, YR27, R20, YG09, YG06, YG03, B000, Y08, Y06, Y02, T7, T5, and T3. I also drew some details on his cocktail glass with a Copic Multiliner and used a White Sakura Gelly Roll Pen on his sunglasses as a highlight. I also stamped out the waves and fussy cut them out.

I took a watercolour panel and die cut a border using the largest die from MFT’s Wonky Stitched Rectangle Stax. I ink smooshed Distress Inks Peacock Feathers. Salty Ocean, Mermaid Lagoon, Evergreen Bough, and Chipped Sapphire. I sprayed the panel with Pearl Perfect Pearls diluted with water in a mini mister then adhered the fussy cut waves and a few Pretty Pink Posh Clear Mix Sequins with my Lawn Fawn Glue tube.

I stamped out the, “Cheers!”, sentiment with Versafine ink and heat embossed it with WOW Clear Gloss Embossing Powder. I adhered the sentiment and cat on the card from with some 3M foam tape, as well as the whole wonky stitched panel to a yellow card base.

This card was entered into Simon Says Stamps Monday Challenge here.

That finishes up my card! I’ll be back soon with an interactive card using this stamp set!

Stamping Bella “The Stuffie Gang” Friendship Card

I’ve been meaning to pull out my Zig Clean Color Brush Pens and do some coloring with them for a bit of practice since I pretty much ALWAYS use Copics.

This is actually currently my only stamp set from Stamping Bella. I received it in a mystery box. I actually prefer clear stamps which is what always deterred me from getting stamps from Stamping Bella (Red Rubber Cling Stamps) but this stamp set is gorgeous and great for water color practice.

stale_thumb_18ae

I stamped the image and sentiment with Versafine and heat embossed with WOW Clear Gloss Embossing Powder.

In no particular order, I used the following Zigs:

-Light Blue #036
-Fl. Green #004
-Yellow #050
-Lemon Yellow #051
-Bright Yellow #052
-Orange #070
-Oatmeal #064
-Mid Brown #065
-Dark Oatmeal #066
-Natural Gray #902
-Light Pink #026
-Fl. Pink #003
-Peach Pink #202
-Germanium Red #029

I cut the panel out with a stitched rectangle from Mama Elephant’s Basic Set and mounted the panel on kraft card stock with 3M foam tape. I stamped the kraft card stock with MFT’s Whimsical Waves Background stamp and heat embossed it with Ranger Liquid Platinum.

To finish up the card I used a few sequins from Pretty Pink Posh Clear Sparkling Mix on the card front.

I don’t do this style of card very often. I think I’m good until next year, haha jk jk…

This is Day 3 of the 30 Day Coloring challenge. You can check out details
here.

This card was also entered in Simon Says Stamps Wednesday Challenge here.

Thanks for stopping by!

Lawn Fawnatics Challenge #30: Lawn Fawn So Jelly Floating Shaker Card

I’m working through stamp sets that have been sitting in my to-use pile for quite some time. I guess it doesn’t help that I keep buying new stuff. It kind of makes my to-use pile never ending.

I had the idea of making this card for quite some time. I wanted to use Lawn Fawn’s So Jelly stamp set and I wanted to make a shaker card and suspend the jellyfish on invisible thread to make them have a bit of mobility and make them appear as if they are floating.

So my original idea for this card didn’t really turn out the way I expected it to. I wanted to do 5 jellyfish in a portrait style shaker card but while I was playing with placement of the jellyfish, I couldn’t come to an arrangement that I liked so I ended up making a new background to accommodate my 5 jellyfish on a landscape style shaker card. I didn’t want my portrait style background to go to waste so I made an extra jellyfish and set up a little scene for it.

AWa+syjUTzO838LSYiYGfg_thumb_17b3

SsbIrqNfSOGLniO6vzfkxg_thumb_17b0

Here’s a list of products I used:
Jelly Fish: Lawn Fawn So Jelly Stamp Set and Die
Seaweed and Rock (Portrait style shaker): Lawn Fawn Mermaid For You Stamp Set and Die
Seafloor (Portrait Style Shaker): Lawn Fawn Stitched Hillside Borders Die
Background: MFT Whimsical Waves Background Stamp
Frame: Mama Elephant Madison Avenue Creative Cuts
Embossing Powder: Wow Cloud 9

4VATzYf6RuedoZUWqAV9aw_thumb_17b9

f+uYypjeTrWYE1eysPbZ4A_thumb_17b6

The background was done with my Zig Clean Color Real Brush Markers. I used the colours Turquoise Green (#042), Persian Green (#033), Marine Green (#400), Dull Blue (#034), and Deep Blue (#035).

Everything else was coloured with Copic Markers,
Jellyfish: B34, BV000, BV02, BV04, BV08, BV13, BV17, BV23, BV25
Rock: W5, W2

The seaweed was stamped with Lawn Fawn Jalapeno Ink.

The photos don’t do the Cloud 9 Embossing Powder justice. It’s way more shimmery in person.

Anyways, you can watch how it came together here:

This card was entered into Lawn Fawnatics #30 Challenge which can be found here.

This is also Day 7 for the Daily Markers 30 Day Colouring Challenge. You can find out details or join in on the fun here

Thanks for stopping by!!

Simon Says Stamp Cute Snowflakes Watercolor Christmas Card

I had the mindset that I would try to make holiday cards all year round but it was so hard to find motivation. I also told myself last year that I would work on my watercolouring and I can’t say I have done much toward that goal. A few projects here and there but nothing much to make me feel like I have made progression in any skill.

So for the last card in my Youtube Holiday Card Series 2017, I’m doing some Distress Ink watercolouring with Simon Says Stamps Cute Snowflake Stamp Set. This stamp set was originally part of a Simon Says Stamp card kit that was released last year. I still love the stamp set but definitely don’t use it enough.

+w6bWFStStyOZvIFM4RpLg_thumb_176d

I heat embossed a bunch of the snowflakes along the edges of the card with WOW Opaque Bright White Embossing Powder. Then I stamped the sentiment, “Wishing you the happiest, merriest, brightest, most fun filled Christmas ever”, from the Simon Says Stamp Peace On Earth Stamp Set, and embossed it with Recollections Gold Embossing Powder.

For my watercolours, I used Distress Inks Cracked Pistachio, Twisted Citron, Mermaid Lagoon, Tumbled Glass, and Blueprint Sketch. I smooshed the ink onto a slick surface, wet my watercolour panel down first then picked up the colour with a brush and applied the colour to my surface.

I cut down the panel using Mama Elephant’s large stitched border from their Peek A Frame Creative Cuts then applied 3M Foam tape to the back and adhered it to my card base.

I basically just explained it all but you can also watch how it came together here:

This card design is also great for making multiples!

InYxYeV5TTu1pZ2dgEAfXA_thumb_177c

This card was also entered in Simon Says Stamps Monday Challenge here.

Thanks for stopping by! Merry Christmas and Happy New Year!! ^_^

MFT Deer Friends Christmas Box Pop Up Card

Another stamp set in my to-use pile, I absolutely adore the deer images in MFT’s Deer Friends Stamp set. I had the idea to do this card for a while but never got around to it until now.

The Deer Friends stamp set coordinates really well with the Sweet Forest Friends stamp set. I haven’t used that one in a while either so I pulled it out for this card. I really wish I had more time in a day to craft. I have so many projects and ideas that I want to execute but so little time.

This is what I came up with:

UNADJUSTEDNONRAW_thumb_176b

If you’re unfamiliar with how to make a box card base, you can check out my Youtube Tutorial here:

JVROtyg7QgyMptoRfWkeDA_thumb_1767

1wSkfFu1Sn+ezdPUtsNC0A_thumb_1769

The patterned paper used for decorative panels on this box card were from Recollections Be Merry Paper Pad and there were 2 slats in my box card to start.

1JTZTQMxTyi4%JWMS57elQ_thumb_176c

Something I did that was a bit different on this card was I stamped all my images out with Versafine on Bristol Smooth Paper and I heat embossed all the images with WOW Clear Gloss Embossing Powder. I did it this way so I could use my Zig Clean Color Real Brush Pens. I don’t use this colour medium enough. I really need to diversify how I do things.

Anyways, you can watch how the card came together here:

Stamp Sets Used:
1. MFT Deer Friends
2. MFT Sweet Forest Friends

Dies Used:
1. Deer Friends Dienamics
2. Birch Tree Dienamics
3. Rolling Hills Dienamics

Inks
1. MFT Black Licorice Hybrid Ink
2. Versafine
3. Versamark
4. Lawn Fawn Walnut Ink
5. Distress Ink Gathered Twigs

Embossing Powder
1. WOW Opaque Bright White
2. WOW Clear Gloss
3. Hero Arts Sparkle

Zig Clean Color Real Brush Marker Colors
-Deer: Deep Brown (#068)
-Rabbit: S. almond Pink (#200), Pale Grey (#097)
-Bird: Yellow (#050), Persian Blue (#032)

c7FPsLTRRfux4ITw1K+tnA_thumb_176a

I’m no longer using affiliate links as it is getting too expensive to maintain. So if you liked this card and want to see more like it, please thumbs up and subscribe to my Youtube Channel or leave me a friendly comment below.

This card was also entered in Simon Says Stamps Monday Challenge here.

Thanks for stopping by!

Guest Design Post: Craftin Desert Divas Harvest Happiness Card #4

Hey Everybody,

This is my 4th and final guest design post for Craftin Desert Divas using the Harvest Happiness stamp set. If you haven’t seen my intro post to this stamp set you can check it out here. You can also see my second card here and my third card here.

Today, I would like to share more simple card making techniques. In this example, I did a lot of masking. I did use masking paper because I had some on hand but you could also easily use post-it notes. So I would stamp an image, place a mask over top, stamp the next image and so on and so forth.

v1n7P0JCTTWMyZk5tKR92w_thumb_173c

All the images were stamped using Versafine ink.
I haven’t used my Zig Clean Color Real Brush Markers for a while so I wanted to pull them out to get more practice with them. I used them by scribbling them on a slick surface and picking the colour up with a water brush.

I used a corner chomper to round the corners and mounted the panel onto a blue 4.25″x 5.5″ piece of cardstock with strips of 3M foam tape.

That finishes up my guest design post series using the Harvest Happiness Stamp set. Thanks for stopping by!


https://linkdeli.com/widget.js?1505902049622

Guest Design Post: Intro to Craftin Desert Divas Harvest Happiness (Card 1/4)

Hey everybody,

I’m guest designing for Craftin Desert Divas this week and wanted to give you a brief overview of the set and a series of examples. I will be sharing one example today but 3 more will be subsequently posted throughout the week using the same set. Each card will feature each scarecrow and my last card will include all 3. I don’t have any other Craftin Desert Divas stamps or dies so I will be using just this stamp set and simple techniques.

For my first example, I wanted to do a simple watercolour background using Distress inks and “ink smooshing”.

TfbYw0otQ0i73JvDX80WeQ_thumb_1721

You can watch my intro and card process below.

These are the Copic colours I used for colouring the images (in no particular order): B23, B24, B28, E50, E53, Y38, Y35, YR16, YR02, Y21, G07, YG06, E33, E37, C1, C3.

This card was also entered in Simon Says Stamps Wednesday Challenge here.

Thanks for stopping by! I’ll be back soon with another example featuring the girl scarecrow.


https://linkdeli.com/widget.js?1505902049622

Lawn Fawnatics Challenge #7: Watercolor

challenge-7-watercolor-1

Is it too early to start making Christmas cards? I wasn’t planning on making a Christmas card, actually, originally I wanted to stamp some images and use my Zig Clean Color Real Brush Markers but I figured I would use my Mission Gold Watercolours because I haven’t used them for a while.

So the Lawn Fawnatics challenge this time around is watercolour themed. I told myself at the beginning of the year, I would work on watercolouring and I haven’t worked much towards improve it yet so I guess better late than never… At least it’s still within the year ^^”….

This is what I came up with:

rsfCzzMrS5Cg8Ejdw8FjzQ_thumb_16af

I’m using my blog to track my watercolouring progress throughout the rest of the year to see if I’ve improved at all. Here’s the process video for this card:

I also feel like I’m getting faster at editing videos. So I guess there will be more videos in the future? ^_^

Check out the Lawn Fawn Challenge blog here and come join in on the fun!


https://linkdeli.com/widget.js

Simon Say Stamp/ Neat and Tangled Cute Chicks Baby Shower Card

So I recently discovered that Neat and Tangled has a challenge blog! You can find it here.

79 watercolor

I love challenge blogs as it really encourages me to keep creating. Unfortunately, I don’t have that many Neat and Tangled stamp sets >__<. I have 2, so it makes it easy trying to decide what to use. I had the Simon Says Stamp/ Neat and Tangled collaborative set Cute Chicks still sitting on my desk from when I made that Easter pop up card two posts ago, so I just decided to use it for this challenge.

The theme for this challenge is watercolour. Watercolour isn’t really a strong point for me and I would like to improve on it. I made it one of my New Year’s Resolutions but I haven’t done much working towards it. I’m pulling out my Zig Clean Color Real Brush Markers for the first time to try out. I LOVE THEM! They are amazing to work with and you can look forward to seeing more cards in the future using them!

U87pRvnLTZWZzrFDjr%8Wg_thumb_168d

I used Strathmore Bristol Smooth Paper and stamped the images from the Cute Chicks stamp set in Versafine Ink. Before I started watercolouring, I heat set it to ensure that it was completely dry. In combination with the Pentel Aquabrush Pens, I used the following Zig Clean Color Real Brush Markers on my card:

-No. 050 Yellow
-No. 002 Fl. Orange
-No. 020 Red
-No. 099 Cool Gray 1
-No. 042 Turquoise Green
-No. 004 Fl. Green
-No. 036 Light Blue

After I finished watercolouring, I die cut the outer edge with the largest die from My Favorite Things Wonky Stitched Rectangle Stax. I heat embossed the sentiment, “Congrats on your growing family”, and heat embossed it with WOW Glitter Clear Sparkle Embossing Powder.

I mounted the panel onto some A2 sized teal cardstock with 3M Foam Tape, then applied some Pretty Pink Posh Sparkly Clear Mix Sequins with
Ranger Multi Medium Matte Adhesive .

To finish up my card I adhered my card front to my card base with my ATG Adhesive.

This card was also entered in Simon Says Stamps Wednesday Challenge here and Marker Pop’s Watercolour Challenge here.

That’s all from me for now, thanks for stopping by!